Master class crafts for the Day of Cosmonautics. Paper tunnel "Space"
Master class with step by step photo. "If you really want to, you can fly into space ..."
Gavrilova Olga Davydovna, teacher of MBDOU No. 180 "Kindergarten of a general developmental type", Kemerovo.The theme of space is always interesting for children. In April, thematic weeks dedicated to Cosmonautics Day are held in kindergartens. Tasks theme week- to develop in children an interest in the world around them: to introduce the concept of space, the first cosmonaut, the profession of an astronaut, to instill in children the desire to be brave, strong, healthy.
Master class "Cosmonaut"
I bring to your attention a way to make astronaut crafts based on a trihedral pyramid. This craft is multifunctional: you can give it to your relatives for a holiday, use it to decorate a thematic exhibition, or use it to get acquainted with the profession of an astronaut.

The master class is designed for the joint work of the teacher and older children. preschool age, kindergarten teachers and parents of pupils.
star house
Ships launch into space
Following a bold dream!
It's great that we could
Break out into the vastness of the Universe!
It's nice to know though
Themselves as tenants in the Star House,
In the Worlds as in the rooms to walk -
Through the threshold at the spaceport.
V. Asterov
Target: learn to make crafts based on a trihedral pyramid.
Tasks: to consolidate the ability to work with paper and scissors, to develop the ability to accurately perform work, to develop fine motor skills hands, creative thinking, cultivate patriotic feelings.

red cardboard;
colored paper in red, white and black;
scissors;
graphite pencil;
glue stick.
Stages of work:
1. Prepare templates for the torso, head, face.

2. Cut out 2 head pieces from red cardboard using a template.

3. Cut out a face from white paper, 2 circles from black paper, 12 mm in diameter. From white paper 1 circle, 12 mm in diameter. Then cut it in half. These will be the eyes. From red paper, cut a circle with a diameter of 6 mm, which must also be cut in half. This will be the mouth.

4. Glue the face detail onto one blank of the head, glue black circles, and white semicircles on them. Glue a small red semicircle - mouth. It remains to draw a nose. Glue the two parts of the head.

5. Attach the torso template to the red cardboard and cut it out. On the reverse side of the workpiece, draw with the tips of the scissors along the fold lines (it will be easier to fold).


6. Glue the pyramid. From white paper, cut a strip 0.5 cm wide for buttons. Cut into squares and glue on the pyramid.

7. It remains to collect the details. The astronaut is ready!

Master class "Rocket"
The master class is intended for kindergarten teachers and parents of pupils.

For this work we need:

white and yellow cardboard;
some shiny red self-adhesive paper;
scissors;
compass;
ruler;
stapler;
graphite pencil;
glue moment.
Stages of work:
1. Cut out a rectangle with sides of 27 cm from white cardboard. and 21cm. On the reverse side, draw a rectangle with sides 22 cm and 19 cm. In the figure, you will get 4 rectangles.

2. Rectangle, with sides 5cm. and 19cm. draw into equal strips (the width of the strips is 1.5 cm) and cut.

3. Gently fold the strips over.

4. Glue the cylinder - a rocket. The diameter of the cylinder will be 6 cm. Bend the strips into the middle and also glue them, overlapping each other. This will be the basis for the nose of the rocket.


5. Cut out a rectangle with sides equal to 22 cm from red self-adhesive paper. and 6cm. Glue on the finished cylinder.

6. Let's start making the bow. On the reverse side of the yellow cardboard, draw 2 semicircles, with a diameter of 12 cm and 14.5 cm. Divide the semicircles into a larger and smaller part, as shown in the figure.

7. Cut out most of the workpiece (future cone), draw a narrow semicircle into equal strips.

8. Cut the strips and carefully fold.

9. Glue the workpiece, you get a cone with a diameter of 6 cm too. Bend the strips into the middle, glue, overlapping each other. It turned out the nose of the rocket.

10. Now let's start making nozzles for the rocket. On the reverse side of the yellow cardboard, draw a circle with a diameter of 9 cm and divide into 4 equal parts. Cut out blanks.


11. From each blank, make small cylinders with a diameter of 3 cm, connecting with a stapler.

12. Using a stapler, attach the nozzles to the rocket.

13. Cut out 2 circles with a diameter of 2.5 cm from self-adhesive paper. for portholes. Collect all the details and glue. The rocket is ready!
Crafts for Cosmonautics Day do not have to be made from "space" materials. Everything that can be found in the house will be used: old boxes, ribbons, plasticine, desire.
Cardboard, pencil, plasticine.
All the planets in order
Call any of us:
Once - Mercury,
Two is Venus
Three is Earth
Four is Mars
Five is Jupiter
Six is Saturn
Seven is Uranus
Behind him is Neptune.
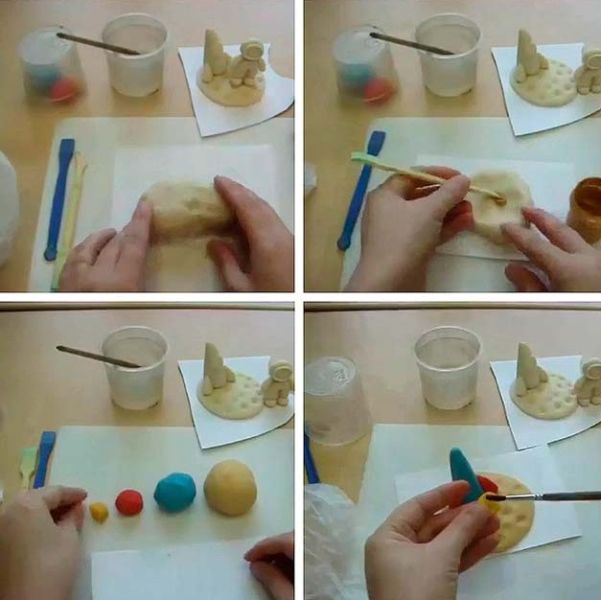
For each planet, their own colors of plasticine were mixed:
Mercury - yellow and black
Venus - yellow and white
Earth - white, blue and green
Mars is red and black
Jupiter - red, yellow and white
Saturn - red, yellow and white
Uranus - white and blue
Neptune - white and blue
The signatures were made with the help of an adult. Because circle organized in the garden of English language for preschoolers, then the names of the planets are duplicated in English.
AT MADOU kindergarten No. 9, Ishim, Tyumen region children under the guidance of the teacher Igisheva Natalya Arnoldovna created mini-copies of space airfields.

This is how Baikonur was seen by the children of the senior group, educators Okhotnikova Elena Nikolaevna, Dolzhenko Marina Alexandrovna.

These are the crafts for Cosmonautics Day made children from MBDOU "Kindergarten" Smile "", Zima, Irkutsk region. The tutor is Polyakova Tatyana Georgievna.
Application "Space".

Application "Mysterious space".

Application from plasticine "Amazing space".

Drawing with wax pencils.

Alien friends.

Alien "Three-eyed".

Alien Bubble-Eyes and Horned.


This work was carried out by Andreykin Rostislav under the guidance of the educator Udovina Natalia Yurievna, MBDOU DSKV No. 2 "Kalinka", Khanty-Mansi Autonomous Okrug-Yugra, Nizhnevartovsk.

Children from the group "Guselki" MKDOU No. 159, Kirov, made a collective craft, under the guidance of teachers: Maltseva Irina Nikolaevna and Novokreshenova Ekaterina Mikhailovna.


Crafts for Cosmonautics Day are made not only by children, but also by teachers. This drawing was made Dmitrieva Yana Mikhailovna, teacher, Kindergarten No. 102, Taganrog.

Guys from MADOU "CRR - Kindergarten No. 10 "Solnyshko"" under the leadership of Rashida Saifitdinovna Aitkulova and Guzel Rinatovna Kaekberdina, they made an entire space station.


The article contains photos of crafts sent to the "Let's Go" contest.
NOTE: Demonstration material at low prices in the specialized store "Kindergarten" - detsad-shop.ru.
A selection of didactic and visual aids for Cosmonautics Day in kindergarten. Useful for a preschool teacher! Excellent quality and inexpensive prices. Specialized shop for kindergartens.


Collective work coloring "Rocket" was performed by children of the senior group No. 11 "Polyanka" MDOU Kindergarten of a general developmental type No. 62 "Scarlet Flower" in Kotlas, Arkhangelsk Region. Teacher Petrushina Alexandra Anatolyevna
Material for work: Coloring "Rocket" on 18 sheets, watercolor colored pencils, wax crayons, glue.

Craft for the Day of Cosmonautics "Rocket" was made by Sharin Timofey senior group No. 11 "Polyanka" MDOU Kindergarten of a general developmental type No. 62 "The Scarlet Flower", Kotlas, Arkhangelsk Region. The craft was prepared with dad. The craft can be used to decorate the Cosmos layout and as material for inflating exercises to develop exhalation strength. Teacher Petrushina Alexandra Anatolyevna.

Teamwork of children preparatory group Mikhailovsky Kindergarten 2 . Educator Berezhnyak Irina Nikolaevna with children Lyakh Taya, Rachenkova Valeria, Chepurnov Artem, Rakhmetov Aslan, Poltava Augusta. The work is called "Fast rockets are waiting for us ..."

Participant - Bulatov Sasha.
Age - 5 years.
Title of the work: “We live in a dream of space!”


Collective work of group No. 1. 3 years. Protvino, Moscow region MBDOU "Kindergarten 4 "Fairy Tale". Teacher: Varvaritsa Yulia Alekseevna.

Stepanov Ilya 6 years


Bonev Semyon 6 years old

Vlasova Valeriya 6 years old

Janus Timofey 6 years

Zhukova Karina 5 years old

Moryakov Saveliy 6 years

Petrova Alena 6 years old

Gulin Danya 5 years

"On a rocket into space" Kozhevnikov Serafim, 5 years old. MBDOU "Kindergarten No. 2" city of Okhansk, Perm region. Teacher Kalinina Nadezhda Vladimirovna.

Korotenko Karina Evgenievna, 7 years old. MBDOU d / s No. 36 in the village of Mesyagutovo of the municipal district Duvansky district of the Republic of Bashkortostan. Model "Planets of the solar system". Head: Ishmukhametova Liana Ildusovna, educator of MBDOU d / s No. 36 in the village of Mesyagutovo, Duvansky District, Republic of Bashkortostan
Works of children of kindergarten No. 36. Leaders: Borisova-Pugacheva O.V., Semenova S.S.

Dmitrieva Elizaveta - 6.5 years

Charkova Sofia - 6 years old

Ivanova Sofia - 7 years old

Velieva Albina - 6.5 years old

Gorodetskaya Daria - 6.5 years

Tiganova Anastasia - 6.5 years

How to make crafts for Cosmonautics Day in kindergarten? Consider what planets are in the solar system! Let's create an amazing rocket, brave astronauts and funny aliens!
Children are happy to listen to stories about the events that happened on this day many years ago, and are easily included in the process of preparing for the holiday. Considering that it is not recognized as a day off, most often children get acquainted with this holiday within the walls of a kindergarten.
Crafts for Cosmonautics Day in kindergarten can be of a very different nature, depicting both real attributes of space and fantastic images. Thinking about space, children often give free rein to their imagination, as in any case when it comes to objects that go beyond the reality around them.
There is no need to prevent this, because, by fantasizing, the child is trying to create his own idea of \u200b\u200bthe distant and unknown. However, it is still necessary to strive to expand the boundaries of his knowledge.
First of all, you need to tell why Cosmonautics Day is so important: a person has long been trying to find out what is beyond the clouds. He saw the light of the stars and the moon, but he could not rise high enough. Until the rocket was invented.
Do-it-yourself postcard for Cosmonautics Day
The postcard is a universal gift for any holiday, including Cosmonautics Day. Volumetric postcards with steps on the fold look very impressive. This effect is achieved very simply - on the fold of the postcard, two cuts are made at a short distance.

We bend the card in such a way that in the places of the incision the protrusion curves in the other direction.

We glue a rocket out of paper.

We decorate the bottom and back surface of the card with the sun, moon and stars. Postcard for Cosmonautics Day - ready!

A postcard with a rocket and stars can be made in a classic style on paper folded in half.

You can make a round postcard with a rocket taking off and the moon.

Salt dough rocket craft for Cosmonautics Day
The image of the rocket can be created by the most different ways. A charming rocket with stars for Cosmonautics Day can be molded from salt dough. We dry the craft in the oven or on the battery (at least 12 hours).

We paint the dried craft with bright colors.

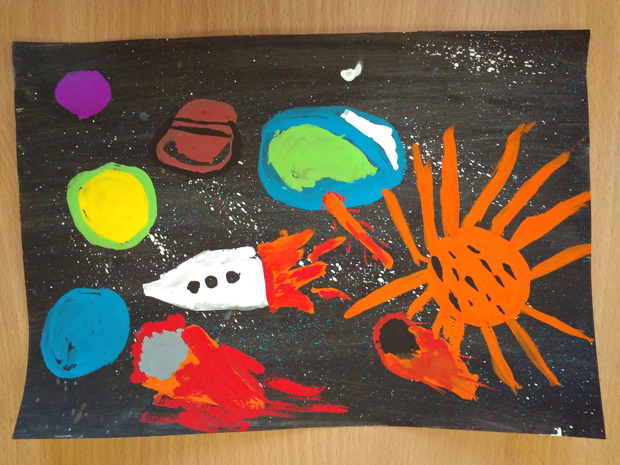
We take a sheet of paper or cardboard and paint it in a rich purple color. When the paint dries, make white splashes on a sheet of paper. We get a beautiful starry sky.

We color the rocket and glue it to a dense base.

To make Cosmonautics Day in kindergarten memorable for all kids, it is necessary to create an appropriate atmosphere. And crafts made by children's hands will do the best job with this task.
Plasticine painting for Cosmonautics Day in kindergarten
On Cosmonautics Day, you can make a real picture from a picture of plasticine. Smear dark purple plasticine on the surface of the sheet.

We decorate it with blue "cosmic whirlwinds" and yellow "stars".

Background with "swirls" and "stars"
We mix together blue, green and yellow plasticine.

We sculpt a flat Earth from colored plasticine and glue it to the base.

We supplement the craft with figures of a rocket and an astronaut. It remains to place the craft in a frame. A three-dimensional picture for Cosmonautics Day is ready!

Plasticine rocket for Cosmonautics Day
Crafts from plasticine for the day of astronautics can be made voluminous. We roll up a sausage from brown plasticine and give it the shape of a rocket body.

The back of the rocket is attached to the body with a match.

We make the fire bright red and fix it on the other side of the match. From yellow plasticine we make portholes and side parts of the rocket.

Watch how to make a beautiful rocket for Cosmonautics Day in the video:
Rockets from different materials for Cosmonautics Day
A very effective rocket can be made from corrugated cardboard folded into a tube.

Volumetric model from a plastic bottle. We paint the bottle from the inside by pouring a little white paint into it and shaking it well until the paint covers all the walls. In the lower part we make two vertical slots, into which we insert wings made of thick cardboard painted in white or metallic color. We decorate the body and wings with ready-made stickers in the form of stars or circles.

The original application "Rocket in space" is obtained from a cardboard roll from toilet paper. To create a starry sky, apply transparent adhesives to the background and sprinkle it with semolina.

Application "rocket in space" in kindergarten
Application - a rocket for Cosmonautics Day (video):
Kids will love the applique "rocket", with their own photo!

A very beautiful rocket can be made from a foam egg, which can be easily found in the "everything for needlework" store. We plant the egg blank on a wooden stick. We color the egg and glue paper parts to it (porthole, wings and tail). A foam rocket does not require much effort and effort, and the result will be very bright and beautiful.

Origami rocket (video)
Craft for Cosmonautics Day using quilling technique on a disk
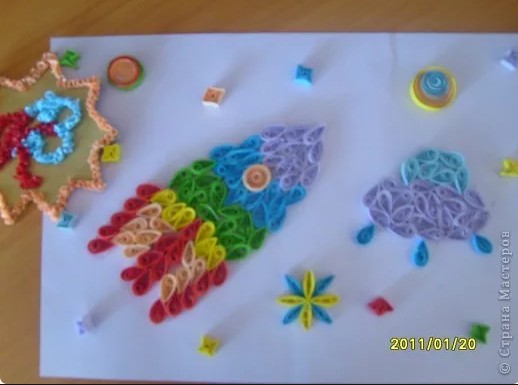
A very effective craft for Cosmonautics Day can be done using the quilling technique (paper rolling).

We twist a circle from brown paper, which we make flat on both sides - this is the rocket body. From thin strips of yellow paper we twist three curls - rolls. We place them inside the rocket - we will get windows.

From red paper we twist the roll, which we make flat on one side. This is a flame.

From white paper we twist the rolls, which we give the shape of stars. Craft for Cosmonautics Day using quilling technique is ready!

Very spectacular rockets for Cosmonautics Day are made from cardboard and toilet paper rolls.

From plastic bottles you can build a funny rocket pack.

Craft astronaut in kindergarten
Pupils of the younger and middle group Kindergarten can offer to make your own astronaut. And not just an astronaut, but the first cosmonaut - Yuri Gagarin.

We invite the children to create their astronauts using the application technique for this. We distribute ready-made spacesuit templates, which we propose to stick on a sheet of purple or dark blue cardboard. And we cut out the astronaut's face from a photograph of a child - let the most courageous children imagine what they will look like if they decide to conquer outer space after they grow up.

Application "Soviet cosmonaut"
A funny astronaut can be made using the application technique from pieces of colored paper. You can also stick a photo of the child - this will make the craft unique.

Application "cosmonaut"
Beautiful porthole windows are obtained from a disposable plate.

This application suggests a lot of interesting topics for the lesson on the topic "Space": the flight of the astronaut dogs Belka and Strelka, the first manned flight into space, the first landing on the moon, the existence of aliens.

Application on the theme "Space"
Planets for Cosmonautics Day
Now we have smoothly moved on to what the astronauts could see, having risen beyond the limits of the earth's orbit. At this moment, we are directing the conversation in a scientific direction, telling the children about the planets. Along the way, you can make a model of the galaxy in the form of an application. We prepare in advance several circles of different colors and sizes and distribute them on a sheet of paper in the way that planets can be distributed in space. The planets look very beautiful on a huge black drawing paper - we get a real outer space.

Highly interesting idea for Cosmonautics Day - make a model of the solar system from ordinary cardboard. We draw schemes of the movement of the planets with shiny glue. The planets themselves can be made from plasticine, papier-mâché, buttons, or colored pompoms.

Crafts for Cosmonautics Day in a box
A very original space craft can be made in a cardboard box. To do this, it will be necessary to glue it inside with foil and glue strings with various attributes of space - the sun, a rocket, an astronaut and stars on the upper part.

At the top of the box, you can make the inscription "space". We will have a wonderful exhibit that is suitable for a space exhibition.

Watch how to make another very effective craft out of the box in the video:
Aliens in kindergarten on Cosmonautics Day
And, of course, every child will be happy to dream up what kind of inhabitants could expect astronauts on the planets. Alien appliqué can be decorated with stickers with stars.

Application "alien life"
And as the basis of the picture, you can use not only a sheet of paper, but also a disposable plate wrapped around the edges with foil.

Kids will love this homemade flying saucer.


A flying saucer made of plastic utensils will not require large expenses, but in beauty and originality it will surpass all other space-themed crafts.

Crafts for Cosmonautics Day in kindergarten on video:
Look at the video, what a wonderful craft you can do on Cosmonautics Day:
Drawing for Cosmonautics Day in kindergarten

Drawing "Space" with crayons and paints

Watercolor drawing "Rocket and astronaut"

Watercolor drawing using salt "Cosmonaut and rocket"
From each group of crafts we form a thematic exhibition, and on a holiday, each child will be able to tell what exactly he remembered about the events that happened many years ago.
Museums of astronautics for children (photos of our readers)

Patterns for cutting for Cosmonautics Day

Cosmonautics Day cutout template "rocket, moon, spaceship and planet"

Cosmonautics Day clipping template "planets, star and comet"

Space cutting template
It is very important to cultivate respect and culture in our children. I consider it very right to widely celebrate the All-Russian Day of Cosmonautics, which takes place on April 12. It is inextricably linked with the name of the first earthling who flew beyond the orbit of the Earth, Yuri Gagarin.
And more importantly, this is our compatriot with you. For our children, this is authority, courage and courage. Therefore, in all kindergartens and schools on this day they hold a craft competition on this topic.
The first thing that comes to mind is a rocket and an astronaut. However, I have found for you a lot of original ideas on the theme of Space, let's start implementing them.
You need to start with the simplest options, so consider what you can make with our preschool children. With them, we will use the simplest materials: paper, cardboard and plasticine.
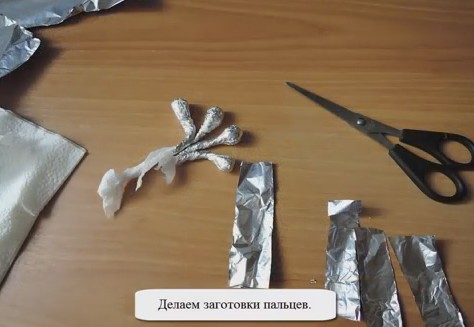
For this rocket, you need to make blanks, because children of four years old are not yet very good at controlling scissors, so they need help cutting out the details.

My daughter just loves gluing rockets. We've already dedicated a whole album to them. For this purpose, specially bought self-adhesive paper. It is very bright and sticks easily.

The idea of a martian from a balloon caught my eye. There is certainly nothing easier!

Also, the alien can be cardboard, and decorate the plate with sequins that stick well to PVA glue.

To help, I suggest taking a ready-made rocket template and stretching plasticine over it with your fingers. To be able to use this picture many times, laminate it or paste it on both sides with wide adhesive tape.

Also use the ready-made forms of the planets for the application, at the same time expand the horizons of the child, explaining to him that there are several planets, and we live on the one that is blue and is called the Earth.

I bring two step by step wizard class, how to evenly embed colored paper blanks.

And another template for cutting. All figures have a long tongue with a former base. This is the base you need to glue. Then you will succeed voluminous application with 3d effect.

Another idea made on a piece of cardboard wrapped in a trash bag. How to make these, I gave a detailed master class.

More cutting patterns.

This flying machine can be assembled from cardboard.


Toilet rolls can be used to make cool simple rockets.

Or use glitter paper to decorate.

Now I will show you how to make such a rocket step by step.

You can combine crafts and postcards. And make the tail of the rocket out of threads of red, orange and yellow colors that resemble a flame.

Look at these templates, it immediately comes to mind that there are also moon rovers, satellites and the planet Moon itself, how many options for creativity at once. Or you can simply cut out these figures and stick them on blue or black cardboard.

Also, just give your child a coloring book on the theme of Space and keep it as a keepsake.


Any of these coloring pages can be used as a template to make crafts from plasticine, stained glass paints or cereals! you just need to fill the space between the lines with the selected material.
For example, my child and I love to stretch plasticine with our fingers. And for this, a coloring with large pictures was specially bought.
By the way, buy soft plasticine for these purposes!
Crafts for April 12 for schoolchildren
For students, the requirements are more complicated. But on the other hand, it is much easier for them than for babies, because the number of materials that they can use increases.
For example, make gingerbread on the theme of the Cosmos in the form of a comet, planets, flying saucer. You can replace the gingerbread with salt dough. And also after baking, paint it with colored glaze. How to cook it is well described by my colleague https://azbyka-vkysa.ru/vozdushnyj-pasxalnyj-kulich.html

Or use cotton pads. They can be colored and passed off as the planets of the solar system.

Also very painstaking work for those who love to embroider with beads. It can be replaced with glass beads, sequins, or even use the cross-stitch technique.

Here is an example of how to replace beads with buttons.

First graders can be offered to make a rocket from a cardboard roll.

Or such an option with a passenger)))

How to make a rocket that has a base is shown in the instructions. Everything is very detailed and the child himself will be able to repeat all the steps.

You can cut the stand according to this pattern.

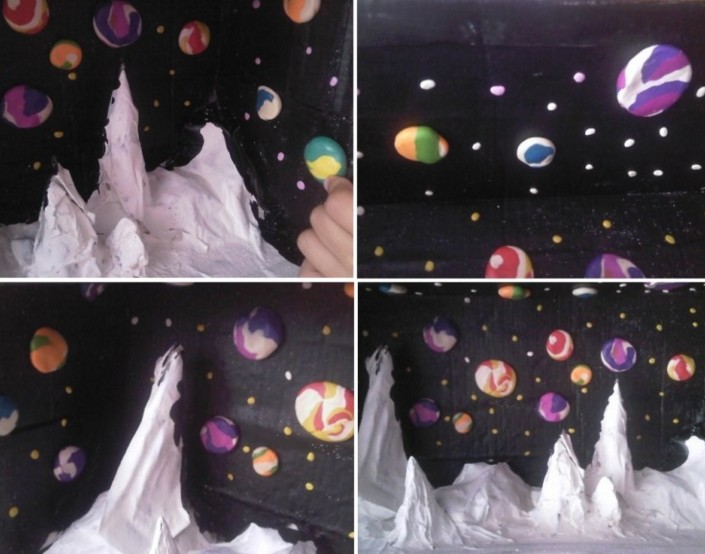
How do you like the idea of volumetric crafts? When the whole Cosmodrome is looking at you, maybe Baikonur itself?

You can make crafts on a stick. We need barbecue skewers. For the tail, use corrugated paper or napkins.

A cocktail stick is also great.

Use two pieces to hide the tube attachment point.

You can create a whole composition of crafts using this technique. By the way, you can put them in a glass with semolina, sugar or salt. The grains and spices will keep the chopsticks from moving and tilting.

Glue the planet out of papier-mâché.

Older children also work with plasticine. But they already use complex techniques for working with flagella and forms.
Another great piece of plasticine. Look, the whole sky is made of these same flagella.

And here is our daughter and my favorite plasticine stretching technique. It is suitable for children of all ages.

Teachers will also like cardboard hangers with passengers inside and thread tails.

If you like to use unusual materials I advise you to take pasta. What do they do with them! Even the balls are pasted over, as we did with threads and PVA glue. Or they create a beautiful design for work.

Felt is also suitable for creativity. It is easily glued with transparent super glue. Products are made from it according to the same patterns as paper applications, so this fabric keeps its shape perfectly and has a thickness that is convenient for work.
In fabric stores, you will be offered many shades and different thicknesses of sheets of this material. There is plenty to choose from.

But according to these patterns, you can assemble an astronaut, a saucer and a rocket.

They need to be transferred to paper, and then to felt.


Make a fabric applique out of it.

This template will do.

Or this is not at all simple, but a super-duper photo frame with the image of children.

By the way, about the photo! They also have some very original ideas. For example, to portray a child as an astronaut.

Or use this angle. You can also stick photos of friends or classmates on each planet.

A paper helmet will help you feel like an astronaut.

It can be made thicker and more realistic using the papier-mâché technique.
To do this, inflate the ball, a newspaper is applied to it, abundantly moistened with a paste. This is how many layers are made. Then, after drying, the ball bursts and gently peels off from the structure. The final layer is always made of white paper so that you can beautifully decorate the craft.

From sponges and polyurethane foam, you can cut out such balls and assemble them into a small copy of the solar system.

I consider this wreath with stars, planets and an astronaut to be an original idea. The figures can be cut out from the colorings presented above.

For home use, make a jet engine out of plastic crafts with your son.

An even more serious version of the space composition, which can be made from salt dough, plasticine and even clay.

Saturn from a plastic ball and disk will conquer any teacher!


Such balls are sold in floristry stores. We made a similar one from polyurethane foam. We poured it into the layout, dried it and cut out the shape we needed with a clerical knife.

The junction will be fixed with a toothpick.

Volumetric application will also appeal to everyone.

All its zest is in the paper spiral that holds the plane or rocket.

Quite a complicated idea from paper pieces. Here it is important to observe the color scheme and the shape of all objects. It can take quite a lot of time, but it looks very grown-up.

More options for simple rockets in different colors.

And now I'll show you how to conquer all classmates and teachers! We need to make something big, like a growth rocket!

In the assembly hall, it can be used as decoration and decoration, as well as as a photo zone.

Or you can leave it at home, let your son be happy.

Here is a variant of the exhibition samples.

It’s not a shame to put forward such a rocket for the competition, but we’ll talk about this later.
Step-by-step origami rocket master class?
Origami allows you to create independent paper objects without the use of scissors and glue. Often one A4 sheet is enough for them. And there are a lot of rocket options, there are those that stand on their tails, and there are those that are used for voluminous applications.

The simplest version of the rocket is made in three minutes.

After you find the middle of the sheet along the length, you need to roll both upper corners towards it.

Then we form the body.

And side pieces. Turning the edge out.

We repeat the same for the second side.

I will also give step by step diagram, which is supported by the upper master class.

The origami base can be supplemented with paper tubes.

There is a technique modular origami when a picture or figure is assembled from many small parts of the same size. Here is an example of this technique.

Of course, it will not work out quickly, but the skill of the hands will develop.
And, of course, you need to see how a complex craft is made.
Be patient and repeat all the steps shown with the child. Perhaps he is your future engineer, or designer!
We make a rocket from plastic bottles and junk material
Increasingly gaining popularity. They are used by summer residents to decorate their site and from them they make homework for school.
For example, using different volumes, you can make such an instance.

Or you have disposable tableware left at home, then you can use it almost for its intended purpose. Replace the plastic plate with a flying one for the alien.

Or transform a bottle of rinse aid into a flying machine, and even with a photograph of an astronaut.

From ice cream sticks plastic container and boxes of processed cheese can also make a cool plate.

And make radar out of wire.

Another idea from disposable tableware.

And when there is a whole bottle of Fanta and some cardboard, assemble a very realistic model.

Aliens can be made from wire and eggs from Kinder.

Old discs will also come in handy.

This option generally deserves all praise. That's really people tried and captured the name of the missile "Mir" and raised our country.

I think you are inspired by these simple crafts, so let's look at how to make them step by step.

You need to cut off the bottom of the bottle, and cut out the porthole.

A cone can be made using this technique, when a circle is made with one cut to the middle and the edge is superimposed on the adjacent side.

We paint all the cardboard parts and the bottle body itself.

For gluing, it is better to use hot glue, so all parts will be better fixed.
Ideas for the competition by April 12
Of course, in every educational institution all kinds of competitions are organized and children are obliged to participate in them. But not all works are then taken to the exhibition. Let's look at options that deserve close attention to ourselves.

For elementary grades, choose a cardboard rocket.

For adults, offer to make a whole composition with elements of the Cosmos.

It is made on the basis of a cardboard box, which is painted blue or black from the inside. And all the prepared elements are attracted to its top on the fishing line.

I specially picked up a lot of photos, made in one idea, so that you can see it better.

You can hang any content in the style of the Cosmos: planets, stars, comets, rockets, astronauts, etc.

I also really liked the voluminous idea of the parade of planets.

It is glued together in layers, in which a smaller circle is cut out.

This is what the workpiece looks like.

A sheet with a cut circle of the largest diameter is placed first, the rest go in order of decreasing diameter.

I would also take a plasticine idea to the exhibition, which is very carefully executed and quite laborious.

An option on how to make craters on the surface of the moon.

Well, remember about the growth rocket, which can also be submitted to the competition. after all, at such events they love big crafts.
I am finishing for today. If you have any other ideas, please describe them in the comments below the article.
Hello dear subscribers and guests of the blog!
I imagine I completely forgot that in April there is another world holiday, which is always celebrated on the same day on April 12 - this is Cosmonautics Day. How can you forget about this.
I decided to correct myself right now and present to your attention a collection of original and unique crafts that you can do at home with your children and bring to a contest or exhibition. Ideas will range from simple to complex so you can choose. After all, someone's children are already adults and go to school, while someone else has very little ones - they go to kindergarten.
I think that everything is clear here anyway, the most important symbol of this holiday will be a rocket, because it was on it that the world's first ejection into space was carried out by Yuri Gagarin, if you have not forgotten.
Yes, by the way, we also do not forget that Easter is ahead, and for it I have already given all kinds of s, remember? Well, do not forget that in May. Wow, cool, like a whole petition.
Perhaps I'll start with the most common and you guessed it, the popular option is a rocket. You can make it yourself from what you always have at hand.
To do this, you can first take a toilet roll, if you don’t have one, then you can twist the cardboard and glue the sleeve.

The stages of work will be such that they are not at all complicated, but on the contrary, using these pictures, you can easily create this unique little thing.

To prevent the rocket from falling, it is necessary to make a support, that is, a stand and fix it on it.


You can create such a huge charm. The kids are about to take flight.

Well, or many of them.

From ordinary plastic bottles, this is what happened.


Here's another charm, the child himself did, pasted over with newspapers.

You can also build a flying saucer.


What will you make it from? Choose from what I found on the Internet, or write below under the article what else you can create from.
From CD disks, as well as decorate with beads and rhinestones, chenille wire.

The legs can be made from wooden sticks or skewers, and beads can be glued down.

Ha, the hands of the staples are done.

Healthy models, you can send them directly to the exhibition.


Plastic cups also went here, it turned out to be a cabin.

Such a space base came out of plasticine and matches.

It looks cool, the main thing is that you can do it quickly and easily, without spending a lot of money and investments.

And if you are tired of everything primitive, then do something creative and your own.

But that's not all, you can make any planet in the solar system, how do you like this idea, see how this is made from papier-mâché.


Or maybe depict all the planets using modeling dough or take ordinary colored plasticine. Twist into flagella, and then, like straws and into a ball.


They don't have enough Martians. Wow, what weirdos came out from the authors, take a look. And the material is an ordinary egg from a kinder surprise, or rather its box.

What a puffy eye, and the legs are made of wire and bottle caps.

Space craft ideas for kindergarten
We have come to the next stage, I will show you what can be done with our beloved kids. Put them in a circle and start doing the following with them, you will need paper, or rather square sheets.

The result will be such that you will definitely like it, and the children will definitely like it.

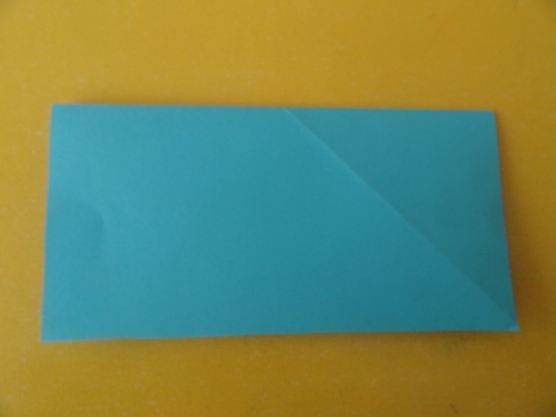
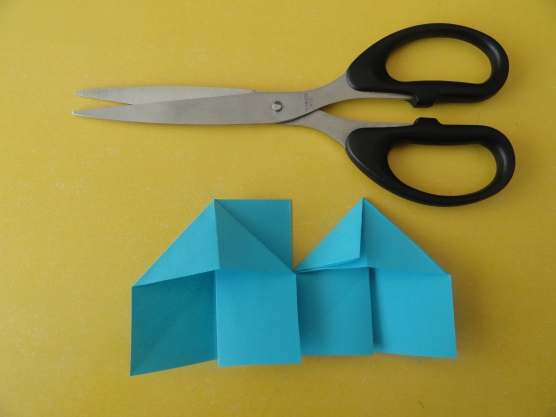
Everyone loves origami. What could be easier? So, fold the square sheet in half lengthwise.
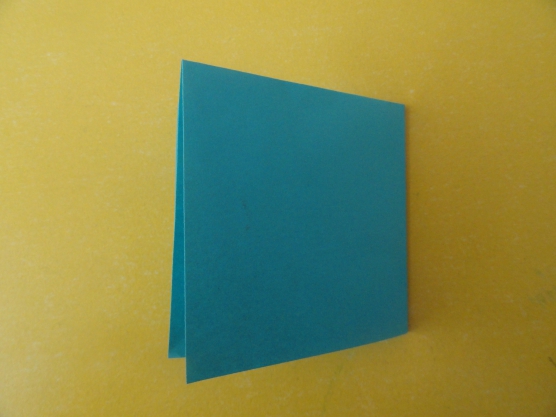
To this fold line, again begin to make folds on both sides.

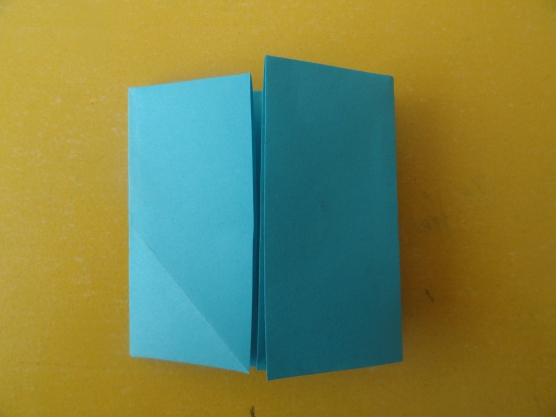
Now bend like this, as shown here.
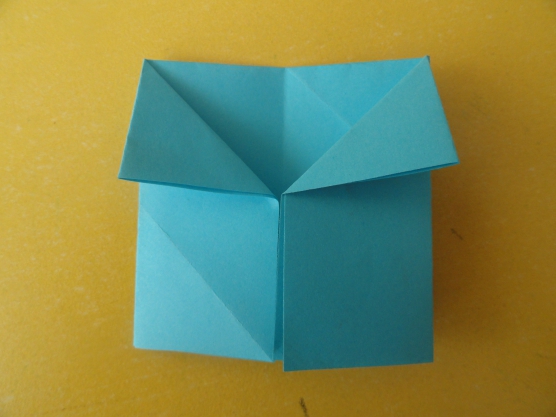
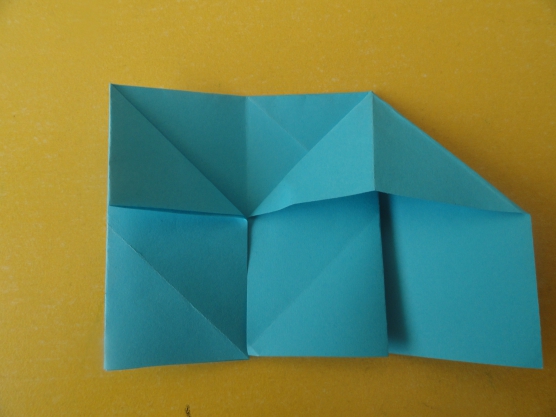
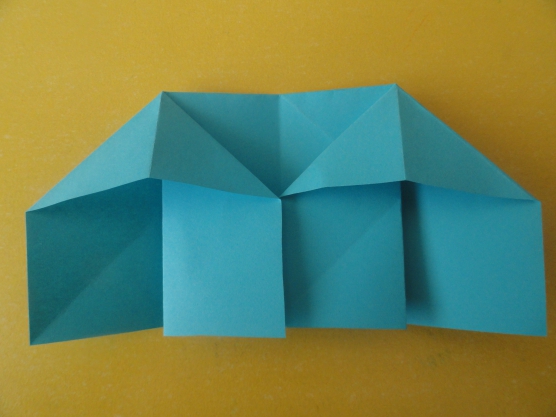
The next step, you have to cut off all the excess.
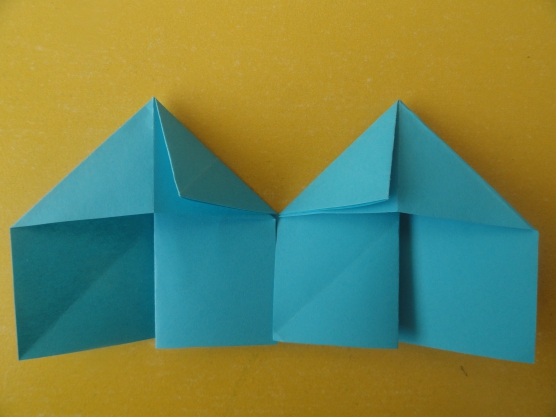
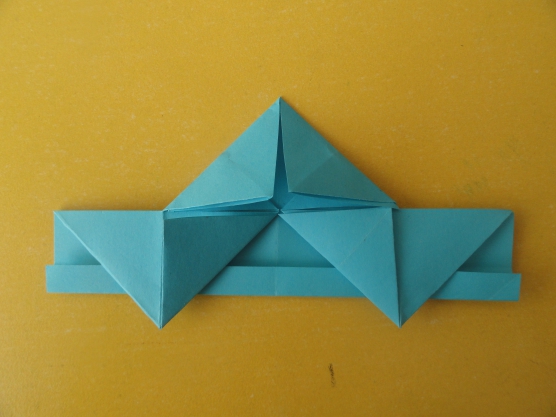
Start folding like an envelope.
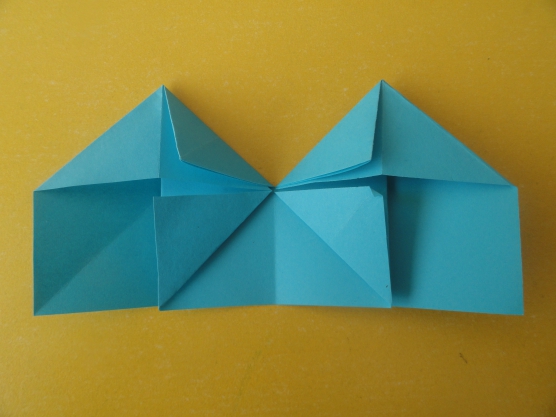

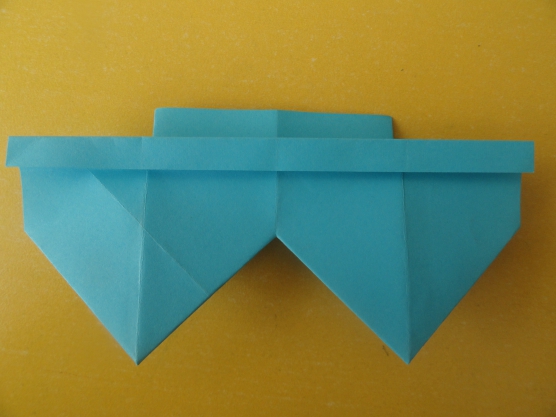
Then, subsequently, two triangular parts will already be visible. Follow further instructions.


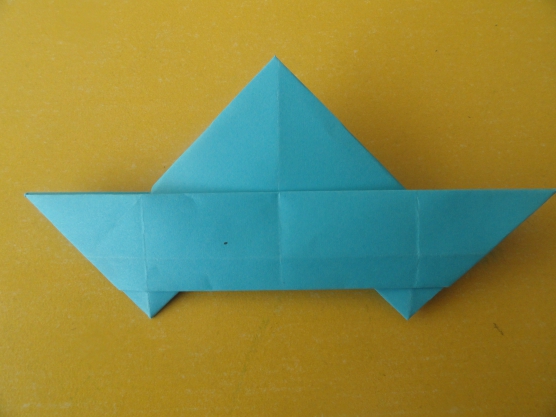
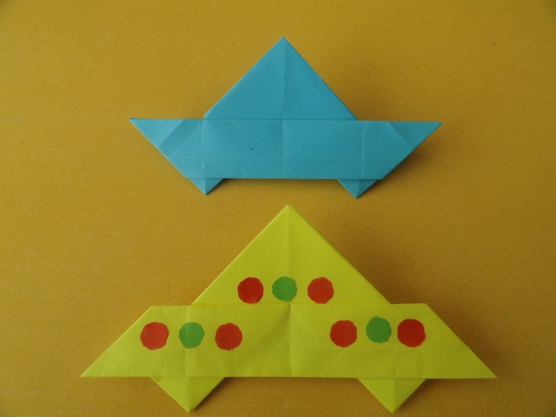
Also, do not forget that you can use plasticine here, roll up small balls from it and fashion it.

Draw or print an astronaut and a rocket for example.

And start painting. This develops not only perseverance, but also attentiveness.

You can roll even more. Or paint pumpkin seeds and stick here, but this is already under the control of adults and at home with their parents.

Or very large lumps in the form of the planets of the entire solar system. Foam rubber was used here.

Here is such a simple model and diagram of a flying object. You can use it further for its intended purpose, for example, for applications, etc.

See how great it can look on a regular sheet of paper.

Here are some other modes of transport with stars.

Can also be made from colored paper unusual craft for a skyscraper.

It is possible to add to this option also little men, inhabitants.

Or make your child a pilot, he will definitely be delighted. Here again, children's hands have adapted with you.

Or the joint work of a group or class with children's photos of children.

You can also take a ready-made template and cut it out, and preschoolers will draw up these details on an A4 sheet.

It all depends on you and your imagination.

Why not, make such a handout for everyone.

Also a super cool idea was to create an astronaut from Kinder Surprise.

A video clip will help you with this, if you want to make something new with your wards.
The simplest work About space from paper and cardboard
Do not forget that you can take any coloring book and paint it with felt-tip pens or watercolors, gouache.


Perhaps even such samples, someone will come in handy for their work.


Or use colored paper and cardboard.

I found works in the country of masters.

Here even Gagarin was portrayed.

Here is a sketch you can print and cut, then glue.

Don't forget to sign the product. It could be a stand newspaper.

Beautiful crafts about space to school
You will probably laugh, but I decided to find something unusual this time, and I found it. Of course, you can take any thought as a basis and add something to it from yourself. Or make a humanoid out of foil and napkins).
The master class will be from Konstantin Kobzik.


You can make a satellite of the Earth. In order to create it, I suggest you watch this video.
Well, or lay out a whole composition from waste material. For example, take a box and paint it in a suitable background.

Glue the stars from self-adhesive paper.


It will be a space object. Attach all other parts to it from plasticine.

Think of something else, like an airplane.

Arrange at your discretion.

You can make such a picture, you can’t do without your favorite cartoon characters. The product is made from molding dough.

You can also use corrugated cardboard and tin cans.

Here is the base.

Or such little men, like robots that live on the moon, lunatics).

Here is such an idea from round pasta.

Choose, here again plasticine.

The whole picture is molded from it.

It looks bright and stylish, your peers will definitely appreciate it.
Do not forget that you can also use the sun here, because it is also a planet.

There are many options, so choose and create!
Cool works from the country of Masters
Here I suggest you look at the pictures taken from this site, maybe this will give you a new idea.
The first thing I noticed was the work done in the style of modular origami. How are you?

Fast flight, woo!

Get out of the cereal, too, what the children have done, take a look.

Someone even managed to tie such a product.

Perform quilling technique.
Here are some more great ideas.


Space dish and aliens from junk material and polyurethane foam
Everything is used here, what you have at hand. Let's together think together what space masterpieces can be created from. That's right, from anything. Take a look, from ordinary shampoo, or rather bottle packaging, they made a race.

And next to it are aliens, uh aliens. In the course and paper plates went, you can take plastic ones.

Here are such chaldobeks. It turned out to be some kind of alien station, as you can see, there are disks and even pasta instead of hands, and the hair is made of straw.

Here are some more ideas from bottles and even adapted a bow.


Wow, eggshell.

The foil work, Belka and Strelka, also looks original, ha))).

Or look at the composition from the box and a bump instead of a launch device.

This one I also liked, made of fabric and buttons.

And I also saw such a watch, super option.

Have you ever tried making salt dough products?

If not, then this moment has come, watch this video from the YouTube channel and you will also succeed in such a charm.
You can certainly use another fabric, such as felt.

Cool crafts, look awesome attractive.


And here is a masterpiece made of polyurethane foam, it looks cool, an astronaut made of salt dough.

From the test it is generally fashionable to create a bunch of crafts.
The souvenir came out on order.

As well as from paper, it resembles a tunnel.

Children's cards on the theme of Space
First of all, I want to immediately offer you to make a postcard, but not simple, but voluminous. You need to choose a plot, if you like this one, as in this sample, then write and send it to you. So, you print it out and then color it with pencils or felt-tip pens.


But to make it look civil, you need to make a cover, fold it in half, and then glue the drawing to it.

Maybe you'll like this one.

Or use the miter method, it is also ideal for this purpose.

Sincerely, Ekaterina Mantsurova