What to do at the carnival fair with your own hands. Crafts for Shrovetide - simple and beautiful amulets for the family
Lyubov Mikhailovna Balabanova
Abstract of the lesson on the application "Shrovetide"
OCCUPATION
ON APPLICATIONS IN THE SENIOR GROUP
« PANCAKE WEEK» .
circle leader "Samodelkin"
Balabanova L. M.
MDOU DSCV No. 12 "Fidgets"
city of Taldom, Moscow region.
Target:
To acquaint children with Russian folk traditions, customs, holidays « Pancake week» .
Tasks:
1. Strengthen the ability to work with scissors.
2. Strengthen the skills of cutting paper along the marked lines.
3. Strengthen the ability to carefully work with glue.
4. To consolidate the ability to compose a whole object from parts.
5. Develop the ability to complement the image with details.
6. Development of fine motor skills in children.
Handout:
1. CD - disks.
2. Cut out circles of yellow paper (2 for each child).
3. Lined sheets of yellow, red, orange paper.
5. Tassels.
6. Stands for brushes.
7. Scissors.
8. Substrates for work.
9. Cloth napkins.
10. Eyes of the sun.
11. Markers.
Course progress.
An evil storm blew up. The night became shorter than the day.
A warm wind blows from the south, drops fall, ringing.
The sun warms the earth, drives ice from our hill.
The snow woman is melting and sheds tears in streams.
Can you please tell me what the poem I just read to you is about?
About the end of winter.
Spring came.
How did you guess?
Snow melts.
Streams run.
Dripping from the roof.
It became warm outside.
That's right, well done! Winter is coming to an end, and people are seeing it off with a noisy, cheerful holiday. What is the name of this holiday?
- Pancake week.
And who will say how this holiday is celebrated?
Sing songs for Shrovetide.
They dance.
They play games.
They dance around Shrovetide.
They bake pancakes.
Singing songs.
Well done!
Pancake week. (A. Usachev)
Hello, Pancake week!
Give us oil!
We will bake hot pancakes for ourselves -
We don't care about blizzards and frosts!
If there is a frying pan
We are not afraid of the cold
'Cause damn it's hot
This is the best food!
Like this Pancake week
Dala butter to us!
Even two appeared in the sky pancake:
This is the sun-pancake, and next to the pancake-moon.
One pancake is hot
Another cold one.
Get on the sky
If anyone is hungry!
Pancake week- one of the most joyful and bright holidays. Pancake week- This holiday has long been beloved in Russia. lasts Maslenitsa all week, and all this time the housewives bake pancakes and pancakes, which are so reminiscent of the sun, invite guests and treat them. In the old days in Russia Maslenitsa glorified the pagan sun god Yarila, and this holiday marked the arrival of spring and warmth.
According to legend, Maslenitsa was born in the north Frost was her father. Once, in severe frosts, a man noticed her hiding behind huge snowdrifts. He called her to help people, cheer them up, warm them up and feed them. Maslenitsa has come. But she turned out to be not a fragile girl, as she was seen at first, but a healthy woman, with rosy cheeks, laughing loudly.
Pancake week had another name - seeing off winter. And seeing off winter and meeting spring is always a holiday. People forgot about the cold, winter frosts, about melancholy and sadness, and had fun from the heart. With coming Shrovetide indeed the weather became milder, and the frosts warmer. It was then that the people decided to arrange a holiday in honor of Shrovetide: the whole world to spend Winter and prepare for the meeting of Spring - red.
The most noisy and fun was the holiday Shrovetide! For a whole week, people have fun, visit each other, come up with different fun and games in the fresh air and, of course, bake pancakes.
Guess the riddle:
Well, which one of you will answer:
Not fire, but it burns painfully,
Not a lantern, but it shines brightly,
And not a baker, but bakes? (Sun)
Correctly! You probably know that when the sun is shining, you are all happier, your mood improves, you want to rejoice, laugh.
As we have already said, all Shrovetide the housewives baked pancakes for a week. Dear guests were invited to pancakes and treats, the more guests, the more happy days a year.
Who can tell me why Pancakes were baked for Maslenitsa?
Because they are like the sun.
You already know that today we will also go outside, we will have fun. And now we will prepare for the holiday. Everyone will make their own sun. Please look at your jobs.
You have 2 yellow circles.
CD - disk.
Lined sheets of yellow, orange, red paper.
From circles we will make the sun itself, and from colored paper we will cut rays.
Why do you think we chose these colors for the sun?
Children's answers.
Because these are the colors of the sun!
Before we get started, it is necessary to remember the rules for working with scissors. Maybe you can help me? Who knows how to handle scissors?
Children's answers.
Scissors should lie with closed blades.
Pass the scissors to each other with the rings forward.
Can't swing.
You can't play with scissors.
Well done boys!
Don't mess with scissors
In vain do not twist them in your hands
And holding the sharp edge
Pass them on to a friend.
Just finished work
Scissors need care:
Don't forget to close them.
And put it in a box.
Fizkultminutka.
We are a glorious family of goats
We love to jump and jump. (jumping in place)
We love to run and play
We love to butt horns (they become in pairs and show "horns" with the index fingers of both hands)
Let's make our suns.
Execution sequence.
1. We cut colored sheets of paper along the marked lines - these are the rays of the sun.
2. We fold the strips in half, but the fold of the strip does not need to be smoothed.
3. Glue the rays on the back of the first circle
4. Apply glue to the CD-disk, apply and glue the first circle, closing the tips of the rays.
5. Glue a loop of thick woolen thread to the CD - disk.
6. Glue the second yellow circle on the other side of the disk.
7. With felt-tip pens, draw the eyes of the sun and glue them.
Our Sun is ready, you can safely go with him to the holiday Pancake week!
Work analysis.
At the end of the work, the children share their impressions, talk about their suns, evaluate the work of their comrades. Summing up. The poem is read.
Goodbye, goodbye
Our Pancake week.
Goodbye, goodbye
Ours is wide.
You came with good
With pancakes, pies,
Yes, with pancakes.
We're rolling down the mountain
From dawn to dawn.
And today, Sunday,
Our fun is over.
Bye Bye,
Our Pancake week!
Related publications:
Summary of the lesson "Red Shrovetide" The theme of complex-thematic planning "Pancake week" Tasks: Consolidation of ways to draw a stylized human figure - Maslenitsa.
All! All! All for the holiday. We meet spring, we see off winter. The beginning of the holiday. Everyone got ready. We offer competition. Who is strong, who.
Summary of the lesson on the application "Bear""Bear". Abstract of the lesson on GCD (application) in the middle group Conducted by Afoshina N.K. Topic: “Bear” Purpose: to create an application “Bear” Tasks:.
 ema: "Shrovetide is our dear guest." Purpose: To acquaint children with the traditions and customs of the Russian people, to form children's knowledge of Russian.
The arrival of spring is absolutely impossible without Maslenitsa, beloved by everyone! Even the ancient Slavs introduced a tradition from year to year to celebrate the arrival of spring, seeing off winter! In those days, large dolls were made, which were called Maslenitsa, and after the festivities, Maslenitsa was burned at the stake to the general laughter!
The holiday of the born Sun was held in songs, jokes, round dances, and its symbol was a pancake, associated with the Sun! Therefore, ruddy-cheeked pancakes with all kinds of fillings were waiting for all the walkers at home!
We won’t bake pancakes, but here’s a talisman, we’ll do it like Shrovetide! And the house feels good - protection has appeared, and the child is happy - a new bright toy!
Our craft for Shrovetide will be something like this and it can be easily done even at school:

To create such a craft with your own hands for the holiday, prepare:
- Bright red acrylic yarn - 1-1.5 m;
- Bright threads "Iris" of various shades (for your taste);
- Sharp scissors;
- Cardboard with sides 10 cm.
The size of our dolls will closely depend on the width of the cardboard, since with its help we will form the body of the dolls.
1. We lay out the “Iris” threads in front of us and determine the sequence of imposing layers of threads. We lay out the threads in the desired sequence.
2. We begin to tightly wind the first layer of thread on the cardboard. The threads must fit tightly, one on top of the other, so that our thread doll has the necessary volume. Having wound the first layer along the entire length, we move on to the second, then to the third and so on ...

3. Now you need to carefully remove all the threads from the cardboard, then tie all the threads well on one side, and cut with scissors on the other side.

4. Before proceeding to the next stage of work, you need to properly align the color layers and trim the sections with scissors:

5. Let's take care of the future hairstyle of our filament young lady! To do this, you need to weave an ordinary pigtail from all the same threads, only one tone! That's just the length of the braid should exceed the size of the doll twice. We fix (wrap, tie) a braid based on a doll and form any hairstyle you like.
6. We tightly tie the neck with a thread, the head should be round and small!
7. The next task before us is to make hands for the chrysalis. To do this, again, we return to our cardboard and wind threads on it, but in any sequence and in turn in each color:

The arms should not be the same thickness as the body, therefore, it will be enough to wind the thread three times less.


10. We put handles between the halves of the body and attach them well there. We tie the doll's waist:

11. And now, to add elements of amulets, you need to tie the torso crosswise with red acrylic thread, wrapping it around the neck on one side, and around the waist on the other. Around the waist, you can wrap several times and impose such a belt with tassels on yourself. Then properly straighten the skirt of our thread beauty, the first doll is ready:

12. So that the young lady from the threads is not bored, I propose to make a boyfriend for her. The first stages are absolutely identical, only we will do the hairstyle a little differently!
13. To make a guy's hair, we do this:
We make a small bundle of threads of the same color as the “luxurious hair” of a thread guy should be. We tie a knot in the center of the bundle and tie it all to the future head of the doll:

14. The head is formed identically with the first doll, only we lay out the hair differently and fix it with a red thread.
15. Body and arms - we repeat everything as for a thread young lady!
16. The final stage - legs! We distribute the bundle of threads coming from the body into two equal parts and tightly rewind them at the very bottom, so to speak, we separate the feet. If desired, you can make a shirt for a guy by cutting the first three layers of thread going down from the waist to the desired length. Here is what a "good fellow" we got:


18. If your Shrovetide craft is given to a young couple who want to have children, then you can add children to this composition to clarify your wishes:

Children must be very small. With a size of 4-5 cm, the manufacturing technology is identical to the “parent” one until the “swaddling” stage - just wrap the little body almost to the very bottom and the thread “baby” is ready!


That's all the "difficult" work, for manufacturing - a talisman for the celebration of the merry Maslenitsa!
Greetings to all! Shrovetide week is approaching and, as everyone knows, there will soon be a performance dedicated to seeing off winter. And how to see off the winter and without the main character, namely, I mean the effigy of Maslenitsa.
Every year she appears in the winter expanses, she is made from different materials, but in most cases from straw, and then wrapped in a bright painted beautiful fabric, it turns out such a big funny girl that looks like a doll or grandmother.
A fair is usually arranged on this day, at which, by tradition, the most important dish is exhibited, so delicious and lacy that you just lick your fingers, because in the cold it is always more fun, and even with the company. You can also see all kinds of exhibitions with different ones that are made by hand.
At the very end of the holiday, they burn it at the stake and at the same time meet spring, which means the sun will burn brighter and birds will sing loudly.
Everyone knows that in Russia such fun things were made from simple material like straw, this is the most common type, and in our time too). Using this simple scheme with a description, you can easily decorate the upcoming celebration, which can even take place at school and kindergarten.

Such an effigy of Maslenitsa turns out to be very large, it looks like a girl or a symbol of a female image.

Of course, they burned big huge stuffed animals on fires, sang songs, but the children could make small creations themselves, also from straw.

These are the beauties.)

Often straw was hidden under any deed or unnecessary things, or even work was done without it.

In my opinion, it looks more like a scarecrow).
Therefore, of course, do from what you have at hand, choose your favorite option.

Especially when there is a place to look and see all the step-by-step actions for making a work:

The result turns out to be beautiful and you will agree that such a craft is done quite easily. Any scarecrow made of straw can be hidden with any openwork or multi-colored fabric.

Or all the same, you prefer the usual version, then at least decorate with a satin ribbon.

Here is another step-by-step instruction from bast for you.

It turned out quite modern and very effective.

We make crafts from a broom
The next option is so funny because it is made from an ordinary broom or broom. Yes, you yourself have probably guessed how to make such a scarecrow and what is taken as a basis.

In general, create and please everyone).

I have no doubt you will succeed.

We make a Shrovetide doll for a holiday to school for an exhibition
In one of my articles, I already shared with you a master class of such crafts from an ordinary plastic bottle and cotton pads, I hope you really liked that doll, if you want to do the same, go
Or make such a miracle worker to meet spring from a tree branch that will look like a slingshot, about 26 cm long.


Or is this the one you like best?


Schoolchildren and preschoolers can come up with anything, here is such an idea for an exhibition, do you like it?

Or else, usually children make drawings, pictures with images of symbols of the upcoming holiday.
This can be done using pencils.

Or felt-tip pens, of course, paints.


Schools also decorate the hall for this event.

Posters and stand newspapers are being made.

Master class stuffed paper at home
I suggest you watch this video, which I liked, I think that you will also make such an interesting souvenir, and from paper.
On one site, I came across another such paper idea, it looks provocatively.

Just like girlfriends)).

You can use newsprint or magazine paper, even color.

Small souvenir made of fabric and thread
I suggest that all craftswomen do the following, take an ordinary fabric and thread and build a doll that will symbolize Shrovetide. Often, such dolls were made and they were a kind of amulets for children.

Do not forget to tie a scarf on your head, you will get such a charm.


As you can see, satin ribbons are also used for garters.

But, even without them, you can make an amazing masterpiece.

Yes, and not one, look.

Such dolls, of course, will become a decoration of the holiday, and most importantly, what else can you make the most important symbol of this celebration, bake real ones or tie them,))).

So, choose any model and create, and then share your feedback and suggestions.

Well, the easiest and easiest option is to build a product from threads.

Or use this video tip.
On this I say to you, see you soon here. Patience and great success at work and everywhere! Bye Bye!
Sincerely, Ekaterina Mantsurova
Features of making crafts for the Maslenitsa holiday with children from plasticine, salt dough, paper, fabric, thread.
The joy of meeting with the spring sun is transmitted to us from nature. Children are the most sensitive to it. They also love to make fun crafts with their own hands and are happy to be involved in this process for the company.
Maslenitsa is a good occasion to show imagination and make stuffed animals, suns, birds, pancakes with children from different materials.
In continuation, we will dwell in more detail on the topic of crafts with children for this holiday.
Craft - do-it-yourself card for Maslenitsa with children

On Maslenitsa, I want to create a thematic postcard. For example, in the form of a smiling girl pancake folded in half.
You need:
- colored paper
- plate and coin
- scissors and markers
- glue stick
Procedure:
- using a plate, trace a circle on a yellow sheet of paper, cut it out and fold it in half,
- from the corner of a red sheet, make a scarf for the girl. Finish the tied tails and uneven edge, cut everything along the contour,
- draw palms on a beige sheet of paper and cut them out,
- circle the coin on white paper, cut out the resulting circle and glue it on a scarf,
- pass the pens and head-shawl to the base-dress of the postcard,
- let the child finish the face, decorate the hem of the dress with flowers or peas.
Inside the card, add an interesting congratulation if you wish. Or let the kid draw thematic pictures, and you add the inscription "Happy Maslenitsa!"
Craft - do-it-yourself sun on Maslenitsa with children

Maslenitsa invites spring and sunny warmth. Therefore, one of the favorite children's characters for crafts is the sun.
To make it, prepare the materials:
- colored paper
- scissors
- compass or plate
- glue stick
- hole puncher
- ruler
- markers
Procedure:
- draw/trace a circle on a yellow sheet of paper and cut it out,
- step back from the edge of 0.5 cm and go around the circle with a hole punch. The more holes there are, the more magnificent your sun will turn out,
- using a ruler, draw the rays in the form of elongated triangles and cut them out,
- show the child the procedure for attaching multi-colored rays. Let him pass each sharp end into the hole, secure it with a glue stick from the back,
- draw the sun's eyes and smile
The rays for the sun can be:
- children's handprints cut out of paper
- paper blanks of a palm with an imprint of children's hands, on which colored paint was applied
And for the middle circle, use a volumetric paper plate, in the center of which draw a smiling face to the sun.
Below are a few ready-made crafts for inspiration:


DIY paper craft for Shrovetide with children

With children it is interesting to create paper crafts of a thematic nature. On Maslenitsa, for example, invite them to glue the doll together.
You need:
- colored paper
- glue stick
- scissors
- markers
Operating procedure:
- fold 2 sheets of multi-colored paper like an accordion, for example, orange and yellow,
- fold each in half. Glue one in the middle for the extreme stripes, and the second in the center so as to connect with the first from above. You have a dress and wide sleeves of the doll,
- make a handkerchief from the corner of the red paper, finishing the ends. Cut it out
- you need a piece of white paper to cut out the circle of the face. Pass it on top of the handkerchief,
- give it to the kid to finish the eyes and smile Maslenitsa,
- carefully glue the finished head to the dress,
- the doll is ready. She is even able to hold herself on her own with her puffy dress.
Crafts for Maslenitsa from plasticine

One of the favorite materials for children to create is plasticine. Therefore, stick the main attributes of the holiday from it to Maslenitsa:
- stuffed carnival
- pancakes
- sun
- cheerful children who lead round dances around a scarecrow
The youngest craftsmen will be happy to “bake” a pile of pancakes for dolls and soft animals.
To do this, prepare:
- yellow and some other plasticine colors
- saucer-lid as a plate for pancakes
Operating procedure:
- roll up the first ball of yellow plasticine and show the baby how to knead it correctly to make a cake,
- if the child needs help, roll a few more balls and knead with your fingers,
- stack the pancakes on a plate,
- add eyes and a smiling mouth from other plasticine colors to the top.
To sculpt a stuffed Maslenitsa surrounded by cheerful guys, prepare:
- more plasticine of different colors
- small scraps of fabric for scarves
- stuffed toothpick
Operating procedure:
- before sculpting a body part on the figures, roll the plasticine into a ball. The largest one is for the torso, hidden under a sundress, a little smaller for the head, tiny ones for the arms and noses,
- blind a cone from a ball for the body, decorate its bottom with colored plasticine, for example, in the form of small flat circles along the radius,
- add sausage handles
- tie a scarf from fabric on the head-ball, add a nose, eyes, a smile, rosy cheeks,
- put the effigy of Maslenitsa on a toothpick.
Blind the sun in several ways:
- add rays from separate parts of plasticine or from pieces of thread to the round pancake base,
- place the center-circle on the cardboard and pull the rays from the first one in different directions with your finger.
Salt dough crafts with children for Maslenitsa

Create from it:
- sun
- openwork pancakes
Bake each blank in the oven, then paint with a coffee solution as inspiration tells you.
Shape the details with:
- crest
- caps
- narrow glasses or pushers
Decorate:
- grains of wheat
- grains of black or allspice
Add sparkle to finished baked Shrovetide crafts with varnish.
For inspiration, a few ready-made crafts in the photo:

Scarecrow for Maslenitsa do-it-yourself

The main character of Maslenitsa is a stuffed doll. It is made in different ways - from:
- paper
- fabrics
- plasticine and dough
Involve the children in creating the stuffed animal by telling them about its history and purpose. And also help to collect the necessary materials for work. If the base is paper, then take newspapers, colored paper. For a cloth doll - scraps of fabric, for stucco molding - plasticine or salt dough.
For example, let's analyze the features of making a Shrovetide effigy with our own hands from fabric and a wooden frame.
Prepare:
- 2 finger-thick branches
- cotton wool or synthetic winterizer
- scraps of fabric in white, red and with a bright pattern
- paper
- needle and thread
- scissors
Operating procedure:
- form a ball from cotton wool / sintepon and wrap it with a white cloth. This is the head of a scarecrow. Attach it to a stick with threads,
- fasten the second stick crosswise with threads just below the head. These will be the hands of Maslenitsa,
- tie a scarf from a patch of bright fabric on your head,
- carefully make a hole in the middle of a rectangular piece of fabric. Pass the stuffed head through it,
- fasten the Maslenitsa sundress under your arms, sew the ends of the fabric to the sides,
- form sleeves from patches of the same color and sew them to the sundress,
- on the wrists of Maslenitsa, tie 2-3 strips of red fabric,
- from a light square cut, make an apron for a scarecrow and attach it to a sundress,
- fasten a sheet of paper under your skirt, on which write everything you want to get rid of in the new year. At the moment of burning the effigy, the fire will take it all away from you.
A quick guide to creating a stuffed Maslenitsa with your own hands, see the picture below:
funny effigy of Maslenitsa from pancakes
You can also make interesting crafts from a delicious Shrovetide treat - pancakes. And get the kids involved! Keep them close to you while making pancakes, so that they can be spun with heat.
From pancakes make:
- cheerful sun with the addition of pieces of fruit, puffed cream
- a well or house filled with sour cream
- dress for Maslenitsa, the basis of which will be the head of a baby doll
Photos of ready-made crafts from delicious pancakes below:

crafts from pancakes for Maslenitsa by children, option 3
Be legislators of good traditions in your family. Attract children to them, then they will grow up happy and cheerful people who respect and honor the heritage of their ancestors.
Happy Shrovetide to you!
Video: how to make a stuffed Shrovetide with a child?
In this article, we want to tell you about crafts that you can do with your child on Maslenitsa. Previously, Maslenitsa in Russia was celebrated on the first day of Spring, March 1. She marked the arrival of Spring, the awakening of nature and the farewell to winter. With the introduction of Christianity, Maslenitsa began to be celebrated in the last week before Lent, so now Maslenitsa falls on different days every year. But in our time, Shrovetide is a mischievous and cheerful farewell to winter and a meeting of spring, which brings revival in nature and solar warmth. From time immemorial, people have perceived spring as the beginning of a new life and revered the Sun, which gives life and strength to all living things. It is customary to bake pancakes on Shrovetide week, which are a symbol of the sun. The theme of the sun is also reflected in the carnival crafts for children.
1. Crafts for Shrovetide. DIY crafts for Shrovetide
To make such a spring, sunny craft for Shrovetide, you will need: colored paper, scissors and a hole punch. Draw a circle on double-sided yellow paper. To do this, you can simply put a plate of a suitable size on paper and circle it. Even for this do-it-yourself carnival craft, you will need to cut out many multi-colored strips of paper, or rather, long triangles. For young children, you can independently prepare all the details of the future carnival crafts necessary for work. Older kids can do this on their own. After that, using a hole punch, make many holes around the perimeter of the circle at the same distance from each other (see photo of crafts for Shrovetide below).
It remains for you to thread the multi-colored triangle strips into the holes with the sharp end, bend them and glue them. What a wonderful carnival craft turned out!

2. Crafts for carnival for children. Crafts for carnival in kindergarten
For kindergarten, you can make the following crafts for Shrovetide. This is a sun made of paper, the rays of which are prints of children's hands. The rays can be cut out of colored paper by circling the child's palm on it the required number of times. Or you can make prints of pens on paper using paints. In both cases, beautiful and unusual carnival crafts for children are obtained. Here is an example of one of the crafts for carnival in kindergarten.


And this is another option for carnival crafts for children. Watch and choose which one you like best. Please note that the sun in the photo below is decorated with an applique of buttons arranged in a spiral. Such an ornament makes this craft for carnival in kindergarten especially interesting.


3. Crafts for Shrovetide photo. Paper carnival crafts
We continue to consider with you various options for paper carnival crafts. In the photo below, the base for the sun is made from a disposable cardboard plate. Agree, an unusual solution! Such a sun would be good to do with a group of kids. Each child will be able to take part in the manufacture of crafts for Shrovetide. To do this, he will need to circle around the contour and cut out his palm. The leader of the group will only have to help the kids glue the rays to the base.


4. Crafts for Shrovetide. DIY crafts for Shrovetide
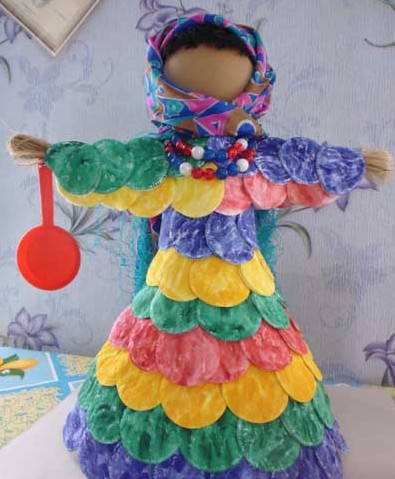
Another indispensable attribute of Maslenitsa is the Shrovetide Doll. Just don't confuse it with the effigy of Maslenitsa, which is burned at the stake on the last day of Maslenitsa week. Here we are talking about Home Maslenitsa, which is considered a powerful amulet. Made with good thoughts, this doll will bring prosperity, love and good luck to your home. There are many different options for making a Shrovetide Doll. We have selected for you the simplest and most popular master classes for making Shrovetide Dolls. See the article at the link.

Material prepared: Anna Ponomarenko