New Year's card made of paper with a rooster. Happy New Year of the Pig cards for children
New Year is a holiday of childhood. Each time, traditionally, he comes under the symbol of some animal according to the Chinese calendar. Upcoming 2017 - . Of course, we want to please each other with gifts. Shops offer a wide selection of ready-made souvenirs, but recently, homemade products have come back into fashion. In the handicraft departments, many kits have appeared for making interesting things yourself. And if you make New Year’s crafts as a gift to relatives and friends with your child, then making New Year’s cards is what you need!
There are many approaches to work. Postcards can be made in several versions. Here are some of them, simple and very interesting.
- Postcard made of colored paper and cardboard.
- Fabric applique.
- Straw applique.
- Postcard in quilling style.
- Postcard in engraving style.
- Drawings with cereals.
Options for postcards based on applique
Postcard made of colored paper and cardboard. The simplest materials will be required.
- colored paper and colored cardboard;
- glue;
- scissors;
- drawing of a cockerel.
You can find a drawing of a cockerel on the Internet or draw it yourself. Disassemble the image into parts, cut each part out of colored paper, and glue it onto colored cardboard. Such a cockerel can be additionally decorated with several real feathers in the tail, rope legs can be made for it, and a toy eye can be glued on. And now the cockerel has become more elegant and interesting. You can complete the design of the card by signing it beautifully or by cutting out a Christmas tree and the numbers of the year from the same paper.

Another option is to make a card from corrugated colored paper. Cut out a Christmas tree and decorate it with pieces of real rain, sparkles and beads, place a cockerel on the top of the tree. There are many fantasies on this topic!
Fabric applique. It is made in the likeness of appliques from colored paper, but the details are cut out from multi-colored, bright fabrics. You need to place them on a sheet of colored cardboard. Such a cockerel can be decorated using the previously proposed methods.
Working with straws. This is very exciting, you can get an unusual card and a lot of fun from the process of creating a gift. You only need one thing that you need to prepare or find on the street yourself: straws. So:
- straws from any cereals;
- tracing paper;
- glue;
- scissors;
- figurine of a cockerel disassembled into parts.
Pour boiling water over the straw, and when it softens, use small scissors to cut the straw on one side and straighten it. There may be an extra thick layer inside; it can be easily removed with a knife. Next, the workpiece must be smoothed with a hot iron.
Attention! The longer you hold the iron on the straw, the darker the color of the straw will be.
The parts of the cockerel need to be cut out from tracing paper and straw glued onto them. Iron and cut along the contour.
Advice! Don’t forget to mark the direction of the straw on the parts and follow this during the gluing process. The directions must match.
On a sheet of cardboard of your chosen color, you need to draw a picture. Glue the straw parts onto this sheet. The result is an original handmade postcard. Or maybe this technique will become your hobby!
Quilling- a fashionable trend in the production of appliques. There are a lot of kits for it on sale. It is also possible to buy stripes of the color you need separately. There is no point in dwelling on the quilling technique in detail; it can be studied in specialized articles.
Draw the composition you have in mind on the postcard. Glue small bobbins made of stripes of different colors, filling in the design. The unusual composition is ready! There is no shame in giving it as a gift.
Unexpected ideas for a New Year's card
Engraving. The task is quite difficult to complete, but if your child is already in school, he will definitely enjoy this activity. Such a postcard will not sparkle with all the colors, but the result is no less interesting. You will need:

- a piece of linoleum;
- cutter;
- roller;
- Oil paint.
Engraving takes practice and time. If you decide to make a postcard in this style, you need to learn more about the technique in specialized sources.
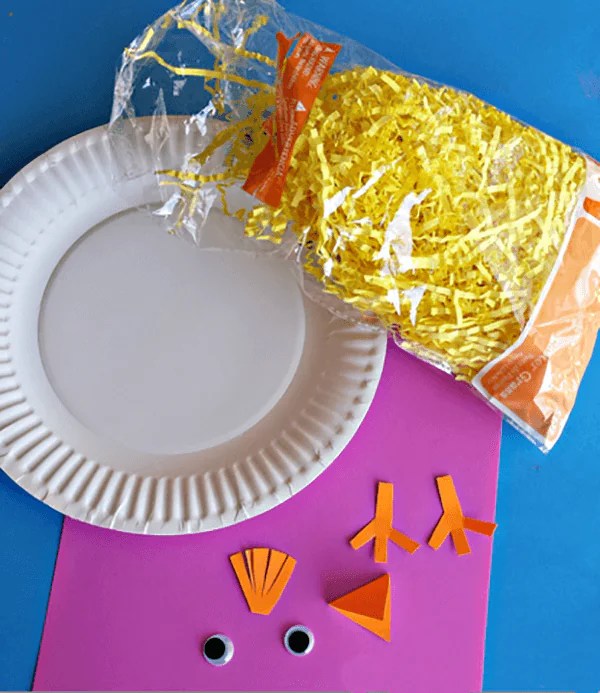
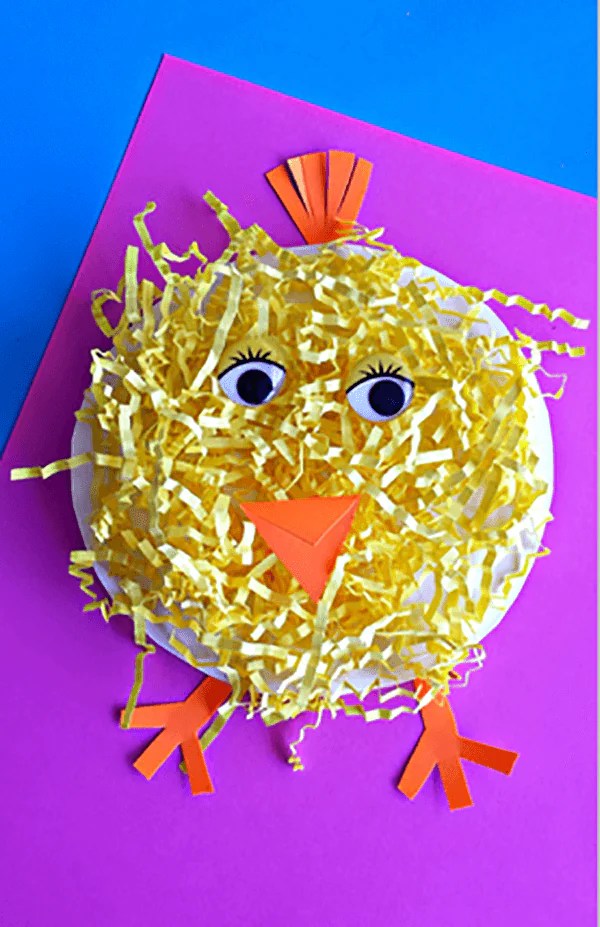
Drawings of cereals, suitable for little kids.
Advice! Do not leave your child unattended while working to avoid unpleasant accidents.
Draw a cockerel, take the grains and, spreading glue on the sheet, arrange the grains by color. The work will dry and become a great postcard!
There are a lot of ideas for making postcards, the best of them are presented in this article. What happens next depends on your imagination. No one forbids combining several techniques into one, and new ideas are only welcome.
How to make a New Year's card: video
It is important to celebrate the New Year of the Rooster correctly in order not to frighten away happiness. And in addition to the basic preparations, do not forget to congratulate your family and friends with cards with warm wishes. However, do not rush to buy such products. It turns out that today it is customary to give cards that were created with your own hands. Indeed, a postcard for the New Year 2017 in the Year of the Rooster, which was created with one’s own hand, will give more emotions to a person. Therefore, in this publication we decided to offer you several options for postcards that you can make yourself.
What cards to make yourself for the New Year
Postcard with a picture of a Rooster.
Despite the fact that the Year of the Rooster is coming, you can give a wide variety of cards to your family. However, all these cards must be made in a New Year's theme. Of course, this New Year you should make some cards with the symbol of this year. Making them is not difficult. The easiest option is to draw a cockerel. But only for this case, choose brighter colors.


Also, to create a card, use the quilling technique. As a result, you can end up with beautiful products. Don't forget to sign your original product.

New Year cards.
In addition to cards with a picture of a rooster, you can give other cards created in the New Year theme. It is worth noting that such a postcard will allow you to show your creativity and demonstrate originality. Further, in our article you will find the most unusual and at the same time interesting postcards, which you will definitely be able to make using our recommendations.
Postcard with volumetric balloons.
To make this bright and unusual card, take:
- an object with a round bottom or a compass;
- designer paper with various patterns;
- white cardboard;
- thin satin ribbon;
- pencil, scissors and double-sided tape.
Progress:
- First, we fold the white cardboard in half to form the base for the postcard.
- We take designer paper and cut out a circle with a diameter of 5 cm. You need to cut out a circle from each sheet of paper.
- At the next stage, bend the circle in half.
- Now take 3 circles and glue them along the fold line. As a result, you should get balls like in the photo.
- Glue the balls that you got to the postcard.
- We attach ribbons on top. In this case, you can make bows from ribbons above the base of the balls.
- Now all that remains is to sign the finished postcard.

Advice! The print on designer paper should combine well with each other.
New Year's card made of colored yarn.
In this article you can find the brightest and most beautiful Happy New Year 2017 Rooster cards. The next card is also very beautiful. This product will appeal not only to children, but also to adults. To make a product, take:
- three sheets of thick paper or three sheets of cardboard,
- PVA glue and scissors,
- double sided tape,
- yarn of various colors,
- ruler and colored pens.
Progress:
- We bend a sheet of cardboard together.
- Cut out a rectangle from paper and glue it approximately to the top of the postcard.
- From the third sheet we cut out a triangle. You must wrap it with multi-colored yarn. We fix the threads on the back side of the triangle.
- Now take multi-colored beads and decorate the Christmas tree with these products. Don't forget to decorate the craft with an elegant ribbon.
- At the last stage, we compose a congratulation and glue it to the postcard.

New Year card with snowflakes.
If the days of December do not please you with snowfall, then you can please yourself with a postcard in the New Year's atmosphere. It's very easy to do. But first take:
- sheet of colored cardboard,
- sheet of white paper
- glue, scissors and just a pencil,
- pen with white ink.
Progress:
- First, cut out snowflakes from an A4 sheet. This is done very simply. You take a piece of paper, put a round object on it and trace it. Then cut out a circle and use a simple pencil to make a snowflake template. Then use scissors to cut out the snowflake. Unfold the snowflake and be sure to iron it with an iron.
- Now glue your snowflakes to the cardboard.
- At the end of the work, we sign the postcard with warm words.

Postcard with geometric herringbone.
A cute Christmas tree card is very easy to make. To do this, choose:
- cardboard is green on one side and white on the other side,
- ruler and pencil, as well as a stationery knife.
Progress:
- Fold the cardboard in half, the green color should be on the inside.
- Now, using a simple pencil and a ruler, draw an even triangle. Inside, we divide this triangle into small triangles. Moreover, the triangles should all have the same size.
- Next, using a utility knife, you cut out the triangles. In this case, you should not touch the base.
- Then we bend the triangles down from the outside of the postcard.
That's it, your congratulations card is ready.

Finally
Now you know how to make a variety of New Year cards. We hope that this activity will give you a positive mood. Therefore, create something original and very beautiful with your own hands.
With the approaching New Year 2017, we are all starting to look for New Year's gifts, and with them New Year's greeting cards. If buying a New Year's card is not an option for you, if you still prefer handmade items, then this article will be useful for you.
The news port “site” in this article has prepared for you several ideas for making New Year’s cards with the symbol of 2017, the red fiery Rooster.
DIY postcard with Rooster

This charming Cockerel in the shape of a lush heart will be able to convey all the warmest and most tender congratulatory speeches to your family and friends, loved ones and friends, work colleagues and just acquaintances.
To make a decoration for a postcard, the Rooster itself, you will need thick colored paper or cardboard, scissors and glue.
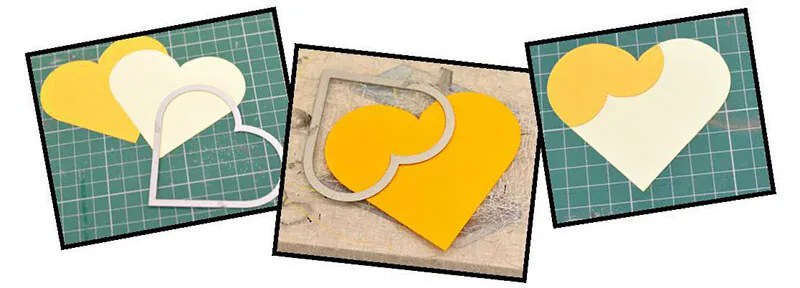
From colored paper you need to cut out the necessary parts, which, without exception, are heart-shaped. Symbolic isn't it? From a thin strip of yellow colored paper, twist a spiral that will become the legs of the cockerel.

Now form a Cockerel on the front of the greeting card and secure everything with glue. Don't forget to sign the card!
Do-it-yourself voluminous postcard with a Rooster

A very unusual option for decorating a greeting card.
From thick cardboard or a plastic disposable plate, cut out an even circle that would fit on the front side of the greeting card.
Now cut thin strips of colored paper and glue it to the prepared circle.
Now all that remains is to cut out the red legs, beak and comb.
And don't forget about the lively eyes!
DIY New Year card with Rooster
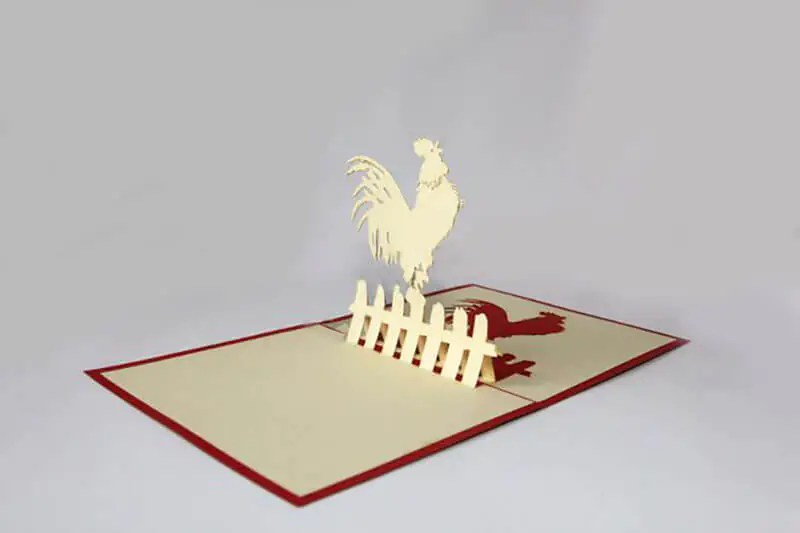
At first glance, this postcard looks completely normal. But you just have to unfold it and scenes of outlandish beauty appear before you.
The best gift for the New Year is, of course, a gift made with your own hands. And if socks or a sweater are not an option for you at the moment, then even a child can handle a postcard. A DIY New Year's card is suitable as a gift for absolutely everyone: friends, relatives, dearest and closest people.
New Year cards can be difficult to make, or they can be very simple, but at the same time not lacking in taste. The most important thing in creating a New Year's card is the flight of imagination. In this article we have collected for you more than 30 original ideas for New Year's cards that you can make with your own hands.
Quite simple to make, but very original New Year's card. To make it you will need: thick paper for the base, corrugated paper, scissors, decorations.
#2 DIY New Year card using scrapbooking technique
Scrapbooking has become especially popular lately, so why not use this technique to create a New Year's card. You will need: thick paper for the base, scrap paper (you can limit yourself to regular wrapping paper), PVA glue, pen or felt-tip pen, decorations.

#3 New Year card made of threads
A postcard made using threads looks original. The designs can be completely different: a New Year tree, a deer, Santa Claus, or simply the inscription “Happy New Year.” To make such a card you will need: thick paper for the base, thread, needle, pencil, ruler, sequins for decoration.


#4 Handmade New Year card using origami technique
An excellent option for a New Year's card would be a three-dimensional card made using the origami technique. To make it you will need: thick paper for the base, colored paper, glue, buttons, sequins, ribbons, etc. for decoration.

#5 New Year card using quilling technique
You can surprise your loved ones with a postcard made using the quilling technique. You will have to spend a lot of time, but it is worth it. You will need: thick paper for the base, paper strips for quilling, scissors, glue, corrugated paper or napkin, toothpicks.

New Year is the most fabulous holiday of the year, on this day everything becomes magical, so it will be very symbolic to give a voluminous card that seems to come to life. To make a 3D New Year's card with your own hands you will need: thick paper for the base, scissors, pencil and ruler, decorations.

For those who love order and control, a handmade New Year's card with a geometric Christmas tree would be an excellent gift option. To make such a masterpiece you will need: thick paper for the base, a stationery knife, a pencil and ruler, PVA glue or double-sided tape.

For romantic natures, strict geometric shapes are not suitable. What is needed here are smooth lines, curves, and additional decoration. In this case, you can give a handmade card made using ribbon and buttons. You will need: thick paper for the base, ribbon, buttons, scissors, glue.

#9 New Year's card from a napkin
To make such a card you will need: thick paper for the base, napkin or double-sided paper, glue or double-sided tape, scissors, decorative elements (beads, rhinestones, buttons, etc.).

#10 Christmas tree card made from colored tape. Preparing cards for the New Year with the children
If there are little residents in the house, they should definitely be involved in creating New Year's cards with their own hands. There is no need to do anything complicated; kids will be delighted with simple crafts, for example, a New Year’s card with a tree made of colored tape. You will need: thick paper for the base, scissors, glue, multi-colored tape (decorative ribbons, strips from old magazines and postcards are also suitable), stickers or other decorative elements.

Another option for a New Year's card that you can make with your own hands with your children is a card with a Christmas tree fan. You will need: thick paper for the base, glitter or rhinestones, wrapping paper, scissors, glue, stapler.

Another simple but very original idea for creating a postcard for the New Year. You will need: thick paper for the base, buttons, glue, tape, pencil or compass.

A great idea would be a postcard with a handmade drawing. For example, you can draw New Year's lanterns: it is not necessary to have the skill of an artist.

You can also draw a New Year's card with the kids. You will need: thick paper for the base, marker, ruler, paints.

To create such a card you will need: thick paper for the base, colored paper, scissors, glue, glitter, rhinestones and sequins.

What you need: thick paper for the base, colored paper for the Christmas tree, pencil, scissors, glue, decorative elements (beads, sequins, stickers, etc.).

For such a card you will need: sequins of different shapes and sizes, a needle, thread, glue, ribbon for decoration.

New Year's cards decorated with felt look very original. We will make cards with Christmas trees from pieces of fabric, but you can use your imagination and make something more complex. You will need: thick paper for the base, felt, scissors, glue.

#19 Very simple DIY New Year card
You will need: thick paper for the base, cardboard for round blanks, colored decorative ribbons, glue, glitter, felt-tip pen.

You will need: 3 sheets of colored paper of different sizes, glue, thick paper for the base.

If you have little time left for postcards, you can try this option. You will need: thick paper for the base, a Christmas tree template, a pencil, glitter, glue, a stationery knife, sequins or beads for decoration.

#22 New Year card with a voluminous Christmas tree made of paper for scrapbooking
A very cute and simple New Year's card. To create it you will need: thick paper for the base, thick paper for scrapbooking or cardboard, glue, ribbon for decoration.

#23 New Year card with voluminous Christmas ball
And here is a New Year's card with a three-dimensional Christmas ball. The manufacturing principle is the same as in the previous postcard, the only difference is that instead of colored cardboard triangles you will need circles. By the way, you can use old postcards as consumables, but only those that are not valuable to you as memories!

#24 New Year's card to the garden
This New Year's opener, literally made with your own hands, is perfect as a gift for grandparents, as well as for kindergarten. Kids will have great fun creating! You will need: thick paper for the base, paints, markers.

#25 Beautiful vintage New Year card
A vintage New Year's card can be made from the most ordinary materials: old notes, thick paper, a beautiful old card (you can cut out any picture from a magazine), glue and a little glitter. Step-by-step instructions in the picture below.

#26 New Year card with voluminous garland
New Year means, of course, a Christmas tree and Christmas tree decorations. In fact, Christmas decorations come in many different shapes, but the most common are balls. This is why we associate Christmas tree decorations and the New Year with balls. So we’ll make a card with a voluminous garland of Christmas balls.

If cards with Christmas trees are unacceptable for you, then you should pay attention to other attributes of the New Year holiday, for example, garlands. We will make a garland from pieces of felt and literally “hang it” on a postcard.

#28 Felt card
To make cards with your own hands, you can and should use various materials, in particular, pay special attention to felt. No, no, not the entire card will be made of felt, but only some decorative elements. In this case, a Christmas tree. How to make a postcard from felt - see the step-by-step tutorial with photos.

#29 Original card in the shape of a Christmas tree
A New Year's card does not have to be square or rectangular. Get creative and make a card, for example, in the shape of a Christmas tree. The idea is not new, but you must agree, it is very, very original! By the way, with such a postcard you can safely go to a competition in kindergarten.

#30 Accordion Christmas tree: making a card with children
A postcard with an accordion Christmas tree will be a great gift for grandma and grandpa. The child can make all the elements of the craft independently. Mom's help may be needed, except for gluing. Take note of the idea and have fun with your child.

#31 New Year card from different materials
But here’s an idea for those who want to make a beautiful, simple and unusual craft - a postcard from different materials. You will need colored paper, fabric, you can also use fringe, braid and other unnecessary little things that are lying around idle and you don’t get around to throwing away. Step-by-step instructions in the photo below.

#32 Sparkles and nothing extra
You can make a stylish New Year's card using glitter. For a greater effect, use dark paper for the base, although you can do it on light paper, only in this case take dark glitter, the gold will be lost on the white background. To make it you will need glue, brushes and glitter. See the step-by-step master class below.

#33 New Year card from scrap materials
Here's a great idea for those who do needlework once a year. The only material for a postcard in the house is paper? No problem! You can make a great card from a coffee carton. How to do it - look at the photo.

#34 Simple card for children
Making crafts with children is a real pleasure. Here you are, mommy, when was the last time you made something with your own hands? In kindergarten, in primary school, at the final exam in art school? That's it, it's so much fun! Children are not only our joy, but also our teachers, who give us the opportunity to remember what we sometimes forget about!

#35 For the little ones
And here is another version of a postcard for the little ones, for those who still don’t really know how to hold a brush in their hands. Well, let your child start learning art from an art house!) A simple card with a Christmas tree made from a handprint.

#36 Unusual DIY snowman postcard
Here's another idea for an original card in the shape of a snowman. Simple ideas are good because they are easy to implement, but at the same time they are not devoid of grace.

#37 Unusual New Year card with children
And another option for a simple postcard to make with children. This craft will look very, very original and is quite suitable for competition work. Prepare a thick sheet of paper and a lot of colored scraps (colored paper, foil, pieces of fabric, etc.). Glue all this stuff onto the base, and then cut out elements for postcard decor from the resulting panel: Christmas trees, gifts, balls, and more.

Photo. 40+ more DIY New Year's card ideas for inspiration


New Year 2017 is the year of the Red (Fire) Rooster, and the most popular gift will be its figurine or image. The needlewomen of Krestik have a good tradition: to prepare thoroughly for the New Year holiday. And this year will be no exception. Many of us will make or are already making a rooster with our own hands, or even not one, but several at once! After all, you must definitely please your family and friends with a handmade symbol of the year, and yourself with the fascinating process of creating this very symbol using various handmade techniques.
Creating a kind of GUIDE TO MASTER CLASSES from the Internet is also a tradition of our handicraft site, which was born a year ago. For you, dear craftswomen, we have selected only the best master classes online. Admire, look closely, discuss and choose the most colorful rooster! And then sew/knit/draw/blind/weave it. So, what technology can you use on the eve of the New Year holiday?
If you don’t have time to work, it doesn’t matter. The article contains links to craftswomen who sell finished works.
Cockerels made of paper and on paper
Making cards with the kids
If you are not a professional cardmaker, then before you start creating cards, be sure to read our article “Learning to make New Year cards with your own hands using the Scrapbooking technique.” In it you will not only find many ideas, but also get acquainted with the basic rules for creating postcards.
Any cockerel drawn by your child can be placed on a postcard. If it’s difficult for your child to figure out how to draw a rooster with his own hands, then show him this step-by-step instructions:

And then, it’s a matter of technology. Cut out the cockerel and make it the centerpiece of the composition. For example, your card can be this simple but cute. In your work, use New Year's paper and a bright red ribbon, add snowflakes, twigs and other holiday paraphernalia. Once you have a basic idea, the process of creating a card becomes much easier!

Photo from the site http://itsapatchworklife.blogspot.ru
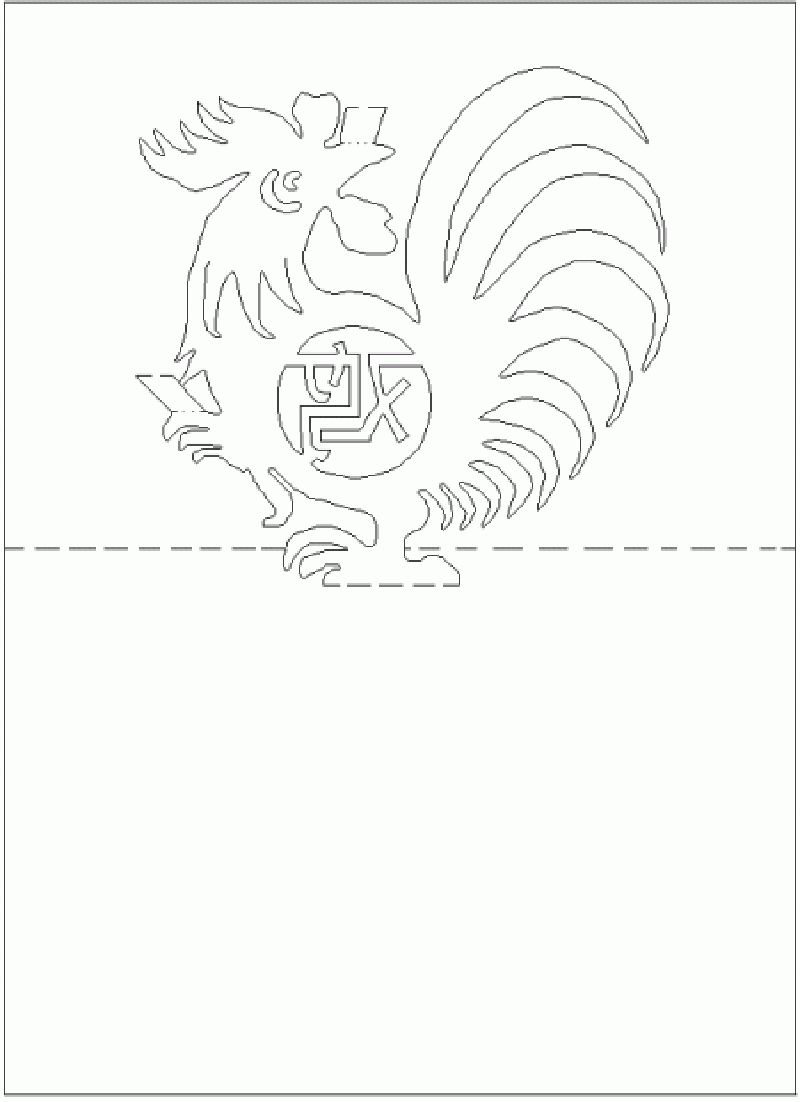
If your child likes to color black and white pictures, give him this opportunity. Print the card template with a cockerel on thick cardboard and let your child get to work. Next, by cutting out a ball blank, you can add voluminous snowflakes to the card, glue half-beads imitating New Year's balls, etc., etc. Give free rein to your and your baby's imagination))

YOU WILL NEED IT
You will find 8 more templates for coloring, as well as 2 step-by-step instructions for drawing more realistic roosters in the archive, which you can download quickly and for free!
Take note of the idea with a cockerel on a stick, like on Elena Yurchenko’s postcard. Her cockerels are cut out of felt, or you can cut them out of paper.

Roosters made of colored paper
An applique made of colored paper can also be placed on a greeting card. But such an application can itself act as a postcard. To draw and carefully cut out all the details, children will need the help of their parents, but they can glue them themselves.

Olga-15 suggests making funny cockerels out of paper in her master class.
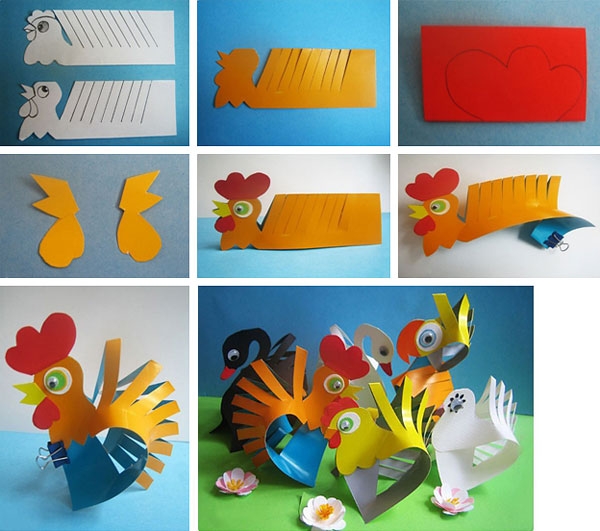
The Rooster blank is a rectangular sheet of flexible paper or thin cardboard, folded in half lengthwise. Its size is 13.5x10 cm. We make 7-10 inclined slits along the fold line (approximately every 1 cm). Their angle of inclination is 50-70 degrees, and their depth is ¾ of the height of the folded sheet.
Ekaterina Ivanova in her video tutorial shows how to make a red rooster using the Origami technique:
Roosters using Quilling technique
A very interesting idea is to lay out only a luxurious rooster tail from quilling paper. It's not as hassle as laying out a whole rooster, and it can turn out very impressive! Here is a rooster without a tail as a basis (see the photo below for how it looked in the original).

Print it on a color printer, and then fantasize about the tail. As an example, here is one such work (although the tail here is modest, but you will try, right?))

And if you are not afraid to make a whole rooster using the Quilling technique, then you can use this ready-made postcard as a basis:

Or this template:

A cheat sheet on the basic elements of Quilling to help you:

Button applique
And here are absolutely stunning handsome roosters, made of multi-colored buttons, half-beads, rhinestones and beads! You can take the contours of the cockerels from our archive as a basis (link just above).


Crochet cockerels
Many needlewomen are familiar with the crochet hook and will be happy to knit a cockerel from multi-colored threads. And Krestik will help you decide on a model and offer several master classes on this type of needlework.

You can also buy knitted cockerels from Svetlana.


Felt roosters
The fastest and easiest options for creating a symbol of 2017 are felt roosters. The material is easy to process, holds the shape of the toy well, and does not require processing of seams. On the contrary, hand stitches along the face of the product give it a special flavor and charm.


Photo from the site https://madeheart.com


Photo from the site http://ktototam.ru/
A rooster figurine carefully cut out of thick felt will be both a Christmas tree decoration and a pendant.

Photo from the site http://ktototam.ru
And if you decorate the felt cockerels with embroidery, flowers and other decorative elements, it will turn out incredibly beautiful!

Photo from the site http://mmmcrafts.blogspot.ru

Roosters in Tilda style
Well, how can we manage now in our lives without the tilde-Rooster? On the ToySew website there is a master class on sewing this popular toy.

Master Vetic on her blog posted patterns for the Rooster and Chicken Peas based on the tilde pattern. An interesting couple will turn out if you put in the effort and patience!

And for inspiration:

Cockerel Yurik from Orange Toys
Maria Fedorova made a funny video about her tilda roosters (the link to the patterns is in the description of the video!):
Coffee cock toys
Aromatic, or coffee, toys compete with tildes in popularity. There are roosters using this technique.

A coffee cockerel can be like this:

Photo from the site http://zabavochka.com
You can easily sew it yourself using one of the patterns suggested above. “Cross” talked about all the intricacies of creating coffee toys in this master class.
If you think that you cannot cope with such work yourself, contact a specialist. Yulia Charikova made enough branded toys with the smell of coffee and put them up for sale at this address.

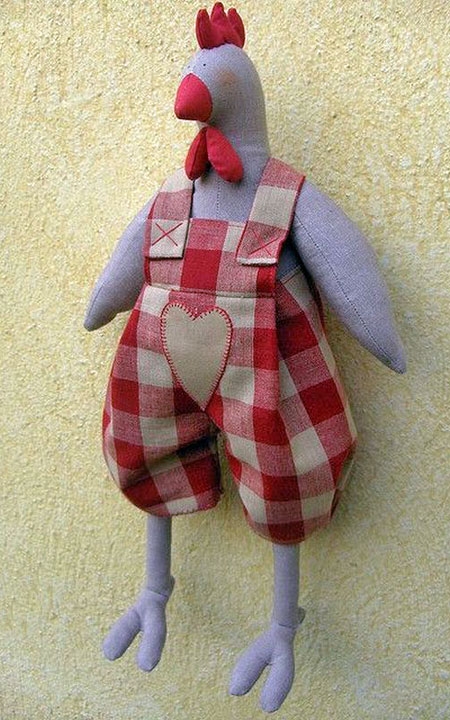
Fur interior toys
Oksana Svyatkovskaya will show her vision of a rooster and show how to sew it correctly using ready-made patterns. Her Rooster is made of faux fur, but who’s to say that it doesn’t happen or that it’s not good?)


In the workshop Everything for creativity (dljatvorchestva) there are a lot of blanks for painting and decoupage. Choose and create!

This is the beauty you can get:


If you don’t want to make a souvenir in the shape of a rooster, then you can decorate any wooden surface with an image of a rooster. The scope for creativity here is simply limitless!!! Here are just a few examples for inspiration:


Roosters felted from wool
Some craftswomen make wool toys that look like real ones! Let's admire and be inspired! And if you really want to buy one of these beauties, then look for them at the Masters Fair (the link is on each photo).


Elenia collected in one place many different Roosters felted from wool and suggested to MK how to create one of them. It turns out very cute!
Roosters embroidered with cross stitch, beads and ribbons
Perhaps you love embroidery more than other types of needlework. Then you can place the symbol of the year on a pillowcase, decorate it in the form of a panel, a picture in a frame or a brooch. The main thing is that the image of the Rooster warms your soul. And if you give away your work, find out the preferences of the recipient.
You will find more than 50 different patterns for embroidering roosters and cockerels in a special album